Traditionally, the practice of dentistry has been a reparative model. We have waited for disease to express itself, and then repaired it. What if we could predict who would express a disease and prevent it from happening in the first place? How would this approach affect the long-term oral and overall health of the dental patient?
Many of our patients tell us, “If it’s not broken, don’t fix it.” Patients are often unaware of the conditions in their mouths because there isn’t an associated disability, and they won’t accept a solution to a problem they don’t have. Thus teeth at risk may remain untreated until a quality of life issue has occurred, such as pain, infection or a fractured tooth.
According to Geurtsen, Schwarze, & Gunay (2003), root fractures are the third leading cause of tooth loss. Tooth loss is a quality of life issue. Loss of a tooth ideally requires replacement, which necessitates further expenditures and procedures. Failure to replace the tooth has consequences, which may lead to further cost and need for treatment or loss of additional teeth. The consequence of the reactive approach to dental care is, at best, a lesser prognosis for the tooth and, at worst, loss of the tooth.
This may be avoidable with a paradigm shift to a wellness model of practice. A wellness model is proactive and preventative. If we can identify a dental condition that increases risk to the tooth and patient, and treat the condition prior to its consequence, we’re effectively reducing risk. The effect is an improved prognosis. Subsequently, health-care costs will be reduced and quality of life improved.
We can do better.
Biomechanical principles
Tidmarsh said in 1979 that teeth are like prestressed laminates. They flex but can return to their natural state. However, under prolonged loading, teeth can permanently deform.
Grimaldi said in 1979 that there is a relationship between how much tooth structure has been lost and deformation.
Cavity preparation or endodontic access destroys the pre-stress state. Teeth can then deform greater and are more susceptible to fracture. Too much flexing makes them crack.
Larson, Douglas and Geistfield (1981) showed that a restoration that takes up just one-third of the intercuspal distance is less than one-half of the strength of an unrestored tooth. The load required to fracture a tooth was the same if the restoration involved only the occlusal surface or included the mesial and distal surfaces as well.
Geurtsen, Schwarze and Gunay (2003) agreed that the risk of cuspal fracture increases considerably when the isthmus width of a restoration is 50 per cent of the intercuspal distance. They stated that amalgam or resin composite restorations should not exceed one-fourth to one-third of the intercuspal distance. The more tooth structure that is removed in cavity preparations, the more the tooth flexes under increasing loads.[1]
Teeth with cuspal fractures may still be restored; however, the prognosis will be lower and less than ideal because there is less remaining natural structure to retain a crown and withstand the flexing from functional and non-functional forces. These teeth may last for years. However, they may eventually fracture at the gingival crest or below, because of further cracks and propagation of those cracks.
Teeth with history of endodontic treatment are at an increased risk of subgingival fracture, rendering the tooth non-restorable or with a poor prognosis.[2] Therefore, it’s important to prevent these cracks from forming at all.
How do we prevent too much flexing in these teeth and prevent cracking? Some have wondered whether a bonded inlay restoration would strengthen the tooth and prevent cuspal fracture.
A study of bonded inlay restorations under static load testing in maxillary premolars with large MOD preparations concluded that bonding ceramic or composite will not strengthen the tooth.[3] A bonded resin or ceramic inlay will not prevent cuspal deformation and fracture. However, bonded ceramic onlays have been shown to be an effective answer in restoring posterior teeth.[4,5]
Bakeman and Kois (2009) stated that all porcelain, adhesively retained restorations offered the possibility of limited or no removal of tooth structure on the axial wall, while covering the cusps. The result is a tooth with more remaining original structure, less flexure under force and thus less risk of permanent deformation and fracture.
It is important to preserve as much enamel as possible, as failure rates of adhesively retained restorations increase the more the tooth preparation involves the dentin.[6] In addition, the size of the remaining enamel ring after occlusal reduction is an important determinant between an adhesively or cohesively retained approach in tooth preparation.
Increased occlusal reduction, or occlusal reduction on a worn tooth, results in a preparation with a reduced enamel ring width. A decrease in the size of the enamel ring thickness from 1.5 mm to 1 mm increased the failure rate dramatically. An enamel ring of less than 1 mm in width would be a contraindication for an adhesively retained restoration, and a cohesively retained restoration would then be required.[7] A restoration bonded to enamel also provides a margin with reduced or no microleakage.[8]
Summary
Aminian and Brunton (2003) stated: “The removal of sound tooth structure is an unfortunate
biological compromise. The conservation of sound tooth structure, therefore, represents an appropriate strategy to minimize biologic risk.”
Adhesively retained restorations offer the possibility to be more minimally invasive while restoring a tooth to natural appearance and function. More conservative removal of tooth structure also means there is less risk to the pulp.
The converse is true in that cohesively retained restorations are more invasive. Removal of more structure increases pulpal risk, decreases strength and increases tooth flexure, which may lead to fracture.
Tooth preparation is also more important as retention and resistance form is essential to retain the crown.
A laboratory can fabricate minimally invasive, adhesively retained restorations. However, chairside CAD/CAM technology can fabricate excellent restorations of the same quality in the same visit. This means the challenge of fabricating a provisional for a tooth preparation that lacks retention and resistance form is eliminated.
In addition, it has been shown that patients prefer a digital impression technique in lieu of the traditional impression method.[9-13]
Yuzbasioglu, et al (2014), also determined that the digital impression method was faster than the traditional method. This finding was also verified by Patzelt, Lamprinos, Stampft and Att (2014), who indicated that workflow efficiency was improved using a digital impression technique.
Case report
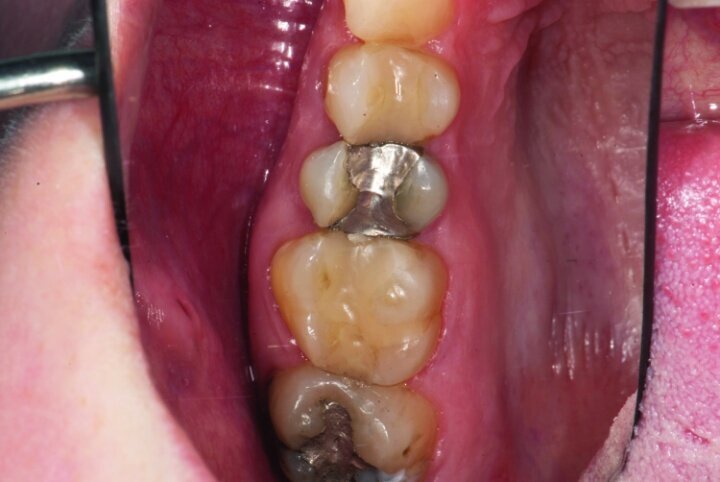
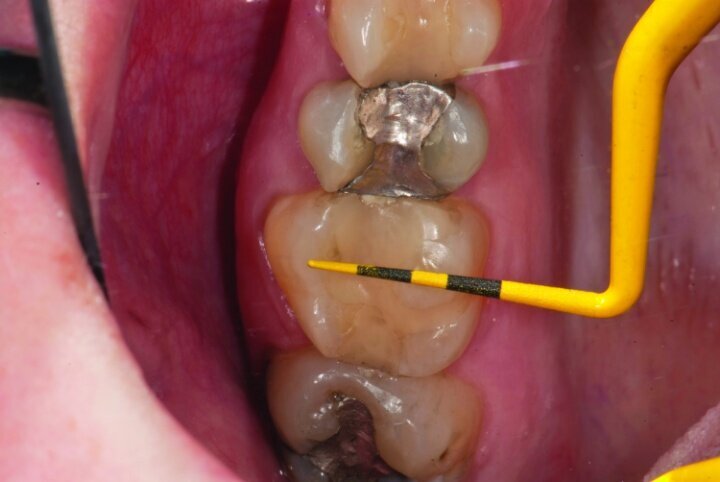
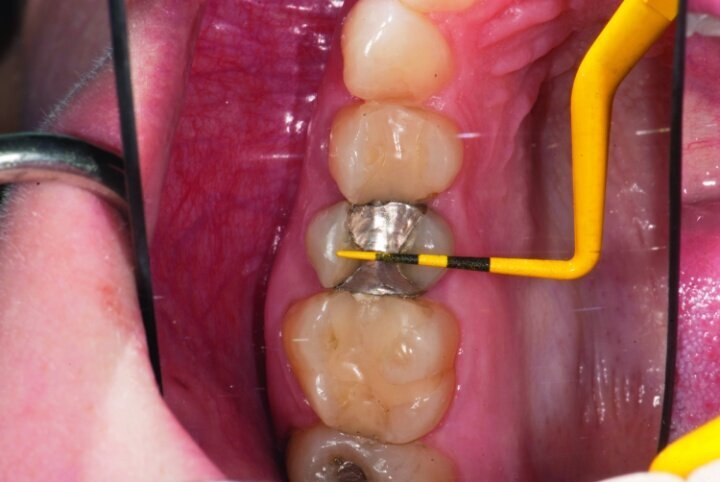
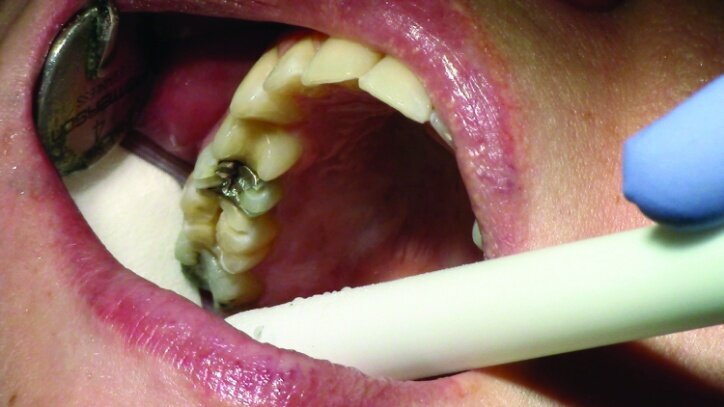
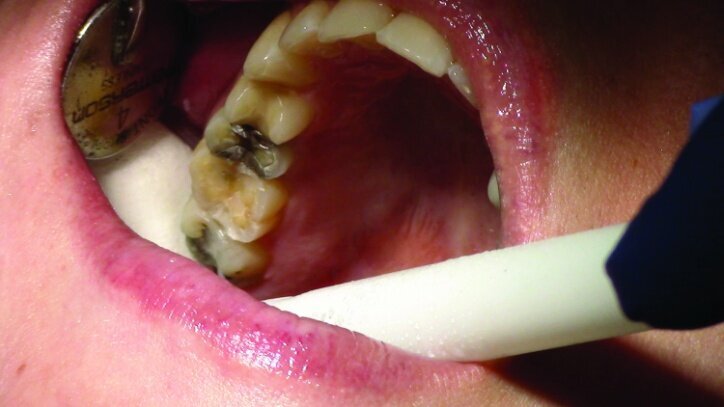
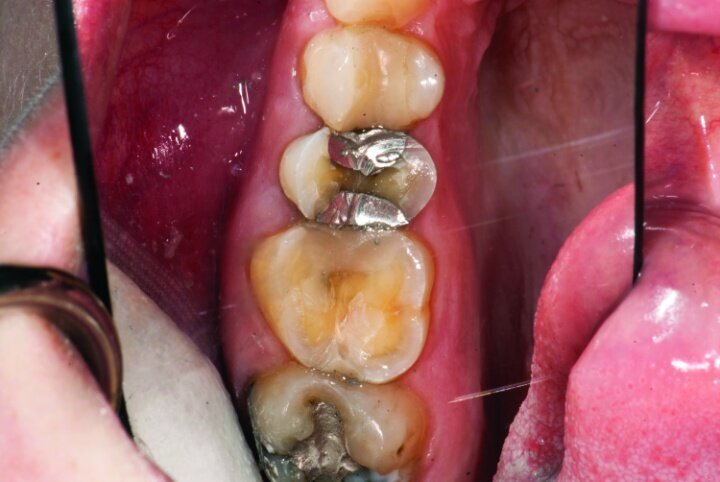
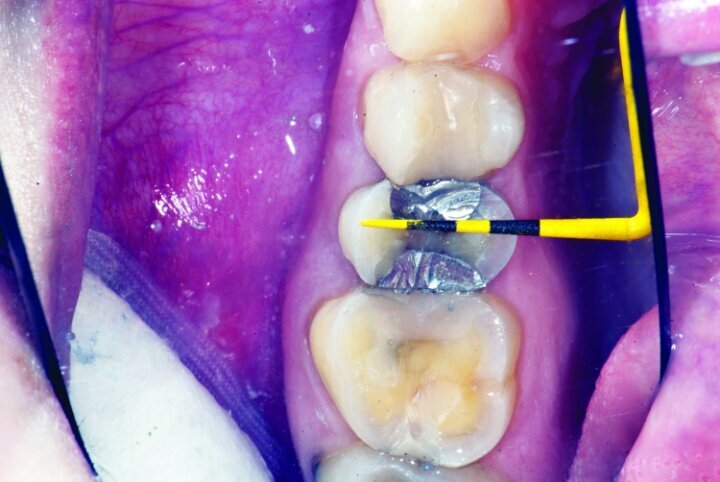
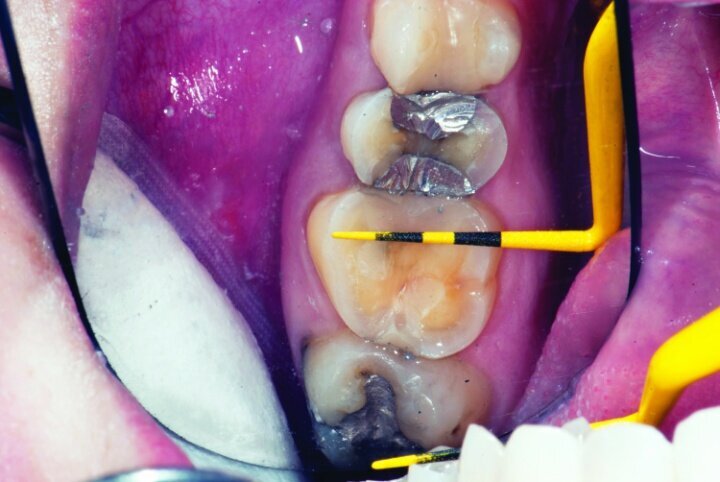
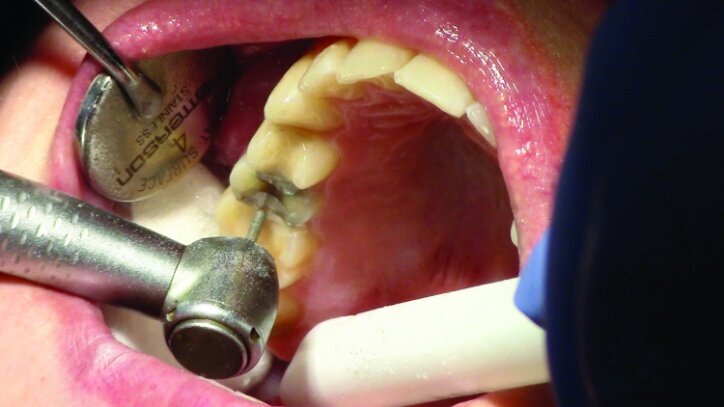
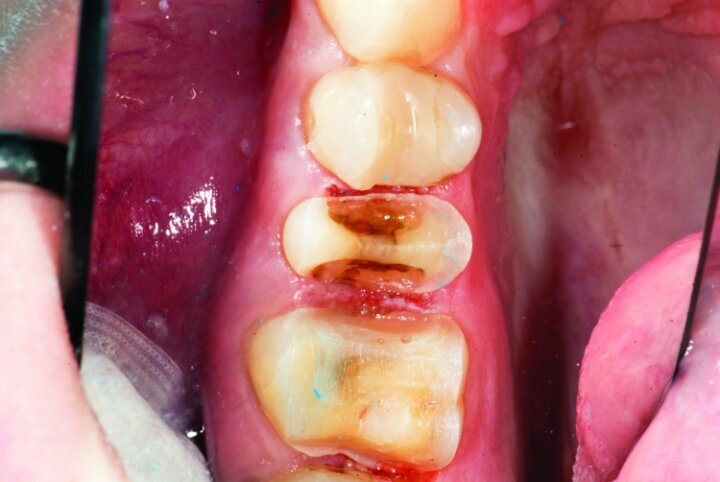
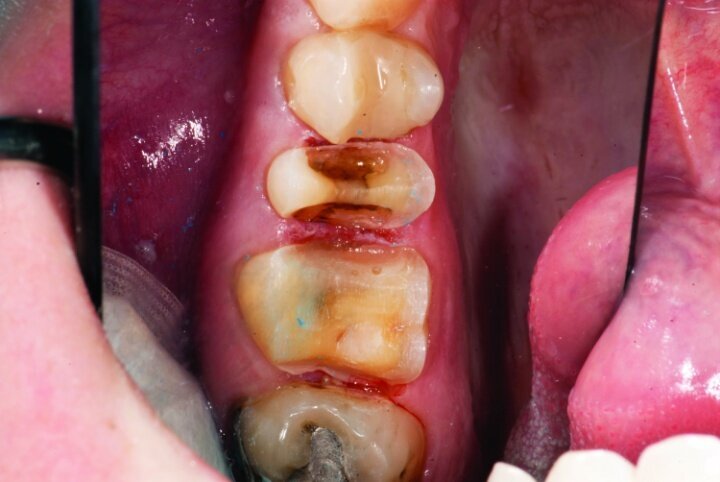
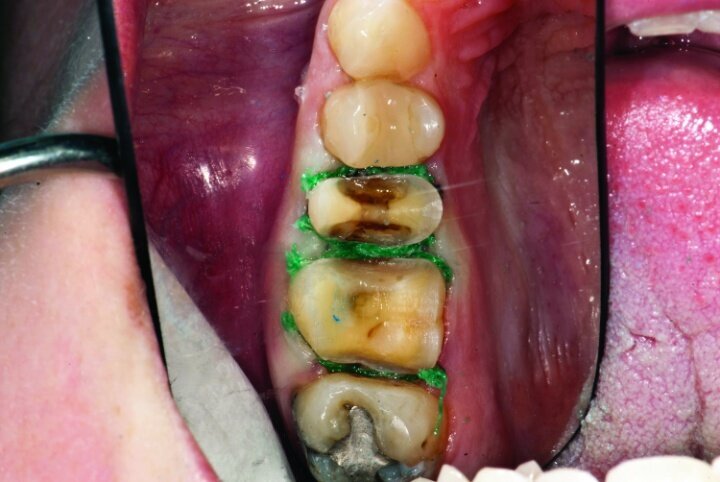
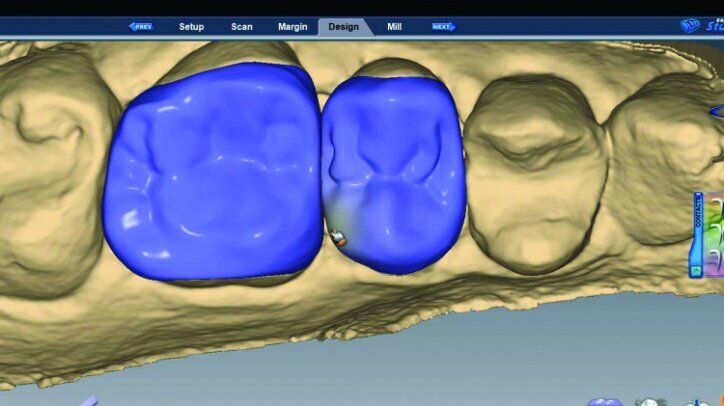
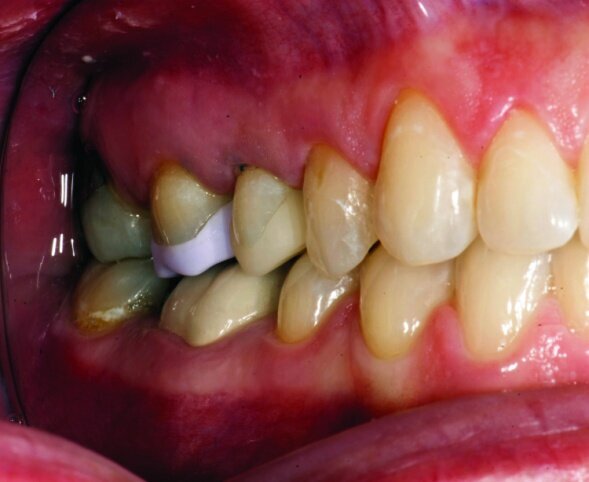
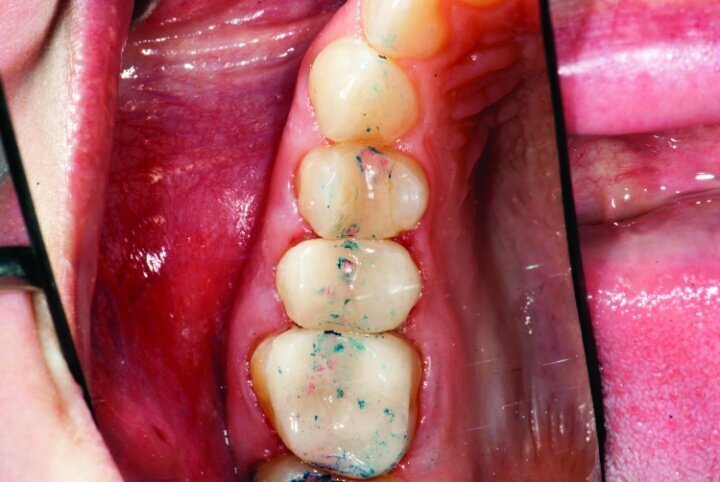
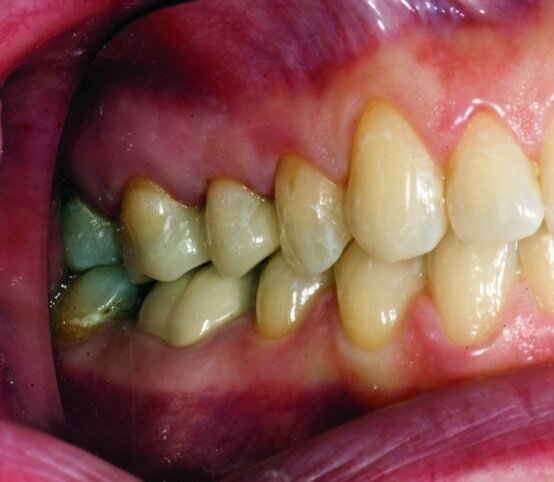
This patient presented for restorations of teeth #3 and #4 (Fig. 1a). Because of the size of the existing restorations, these teeth were diagnosed as structurally compromised (Figs. 1b, c). The prognosis without treatment was fair.
The restorations were to be completed with PlanScan chairside CAD/CAM technology in the same visit.
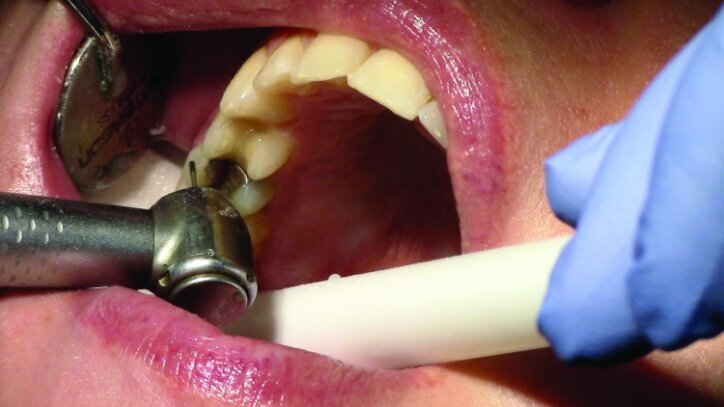
Local anesthesia was achieved with 1.7 cc 2 per cent Lidocaine with 1:100,000 epi, buffered with Onset sodium bicarbonate inj., 8.4 per cent, USP neutralizing additive solution.
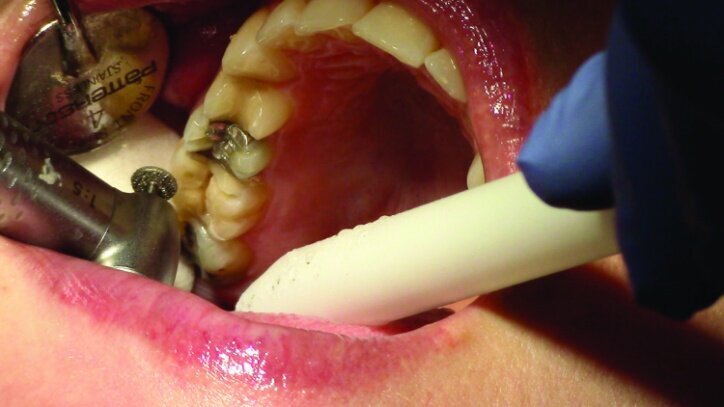
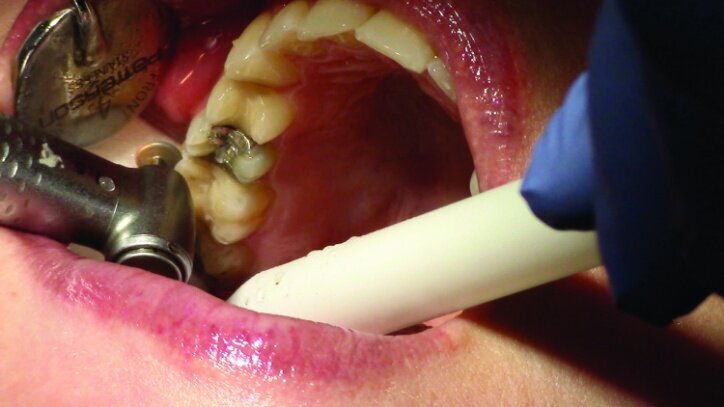
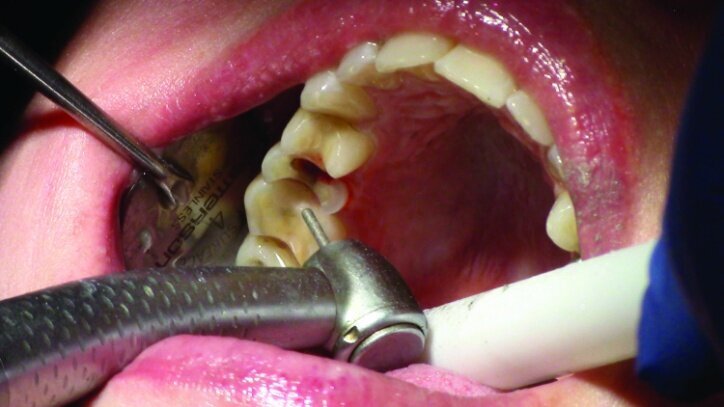
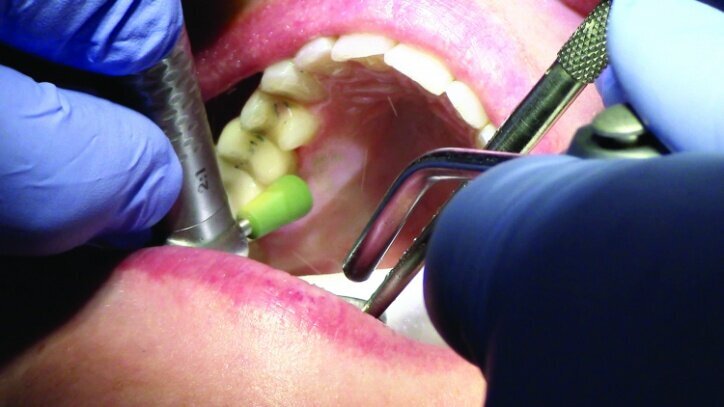
Depth guide cuts were made using a 330 bur, which has a 2 mm cutting surface (Figs. 2a–3b). This ensures 2 mm of occlusal reduction to accommodate 2 mm of material thickness on the occlusal surface of the restoration.
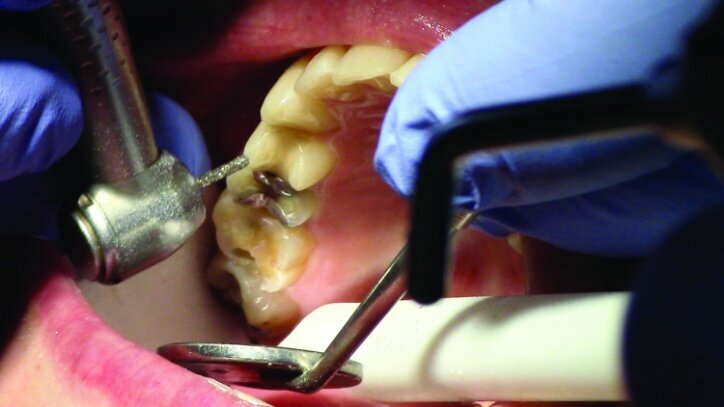
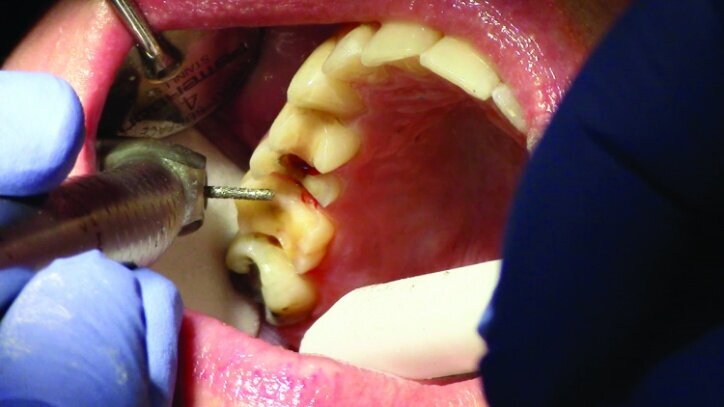
Gross occlusal reduction was completed using a KS7 bur to the depth cuts (Figs. 4–8b, 9c). Adequate clearance was verified with a 2 mm prep check from Common Sense Dental Products.
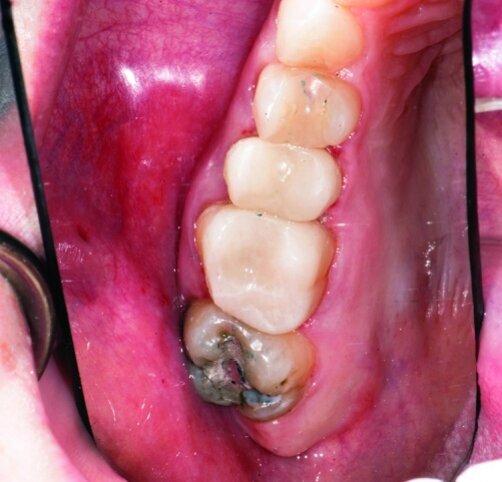
After gross occlusal reduction was completed, the remaining enamel ring was measured (Figs. 9a, b). The enamel rings were noted to be 1.5 mm, and the teeth were prepared for adhesively retained restorations. If the enamel rings were less than 1 mm, the teeth would have been prepared on the axial walls to create retention for cohesively retained crowns.
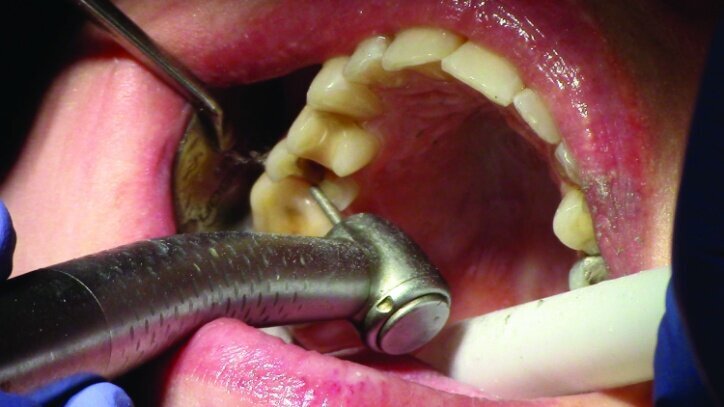
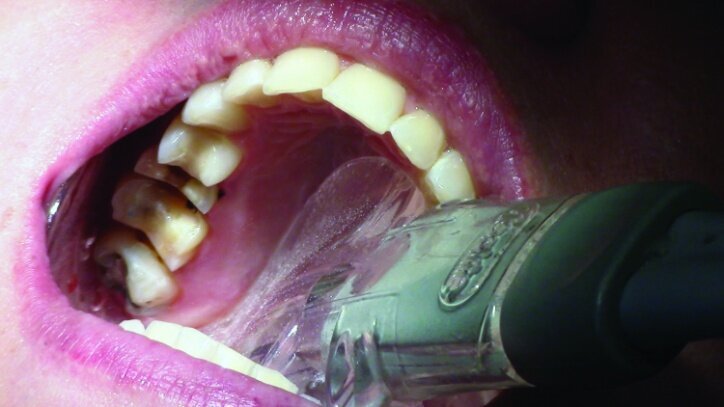
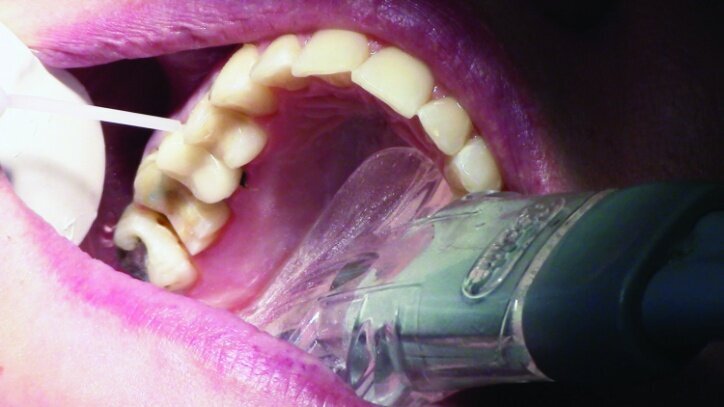
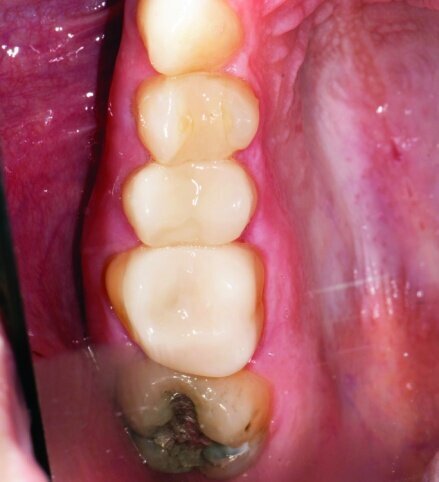
The remainder of the existing composite resin in #3 and the amalgam in #4 were removed. The occlusal surfaces of the preparations were blended into the interproximal areas using a KS2 bur to create smooth preparations (Figs. 10–15c). There was no retention or resistance form prepared to retain the restorations.
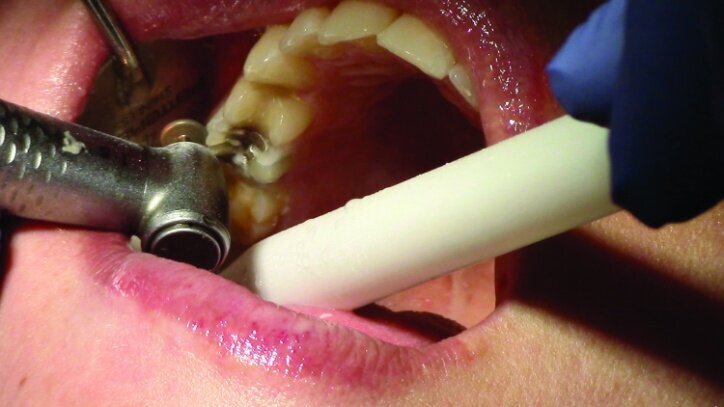
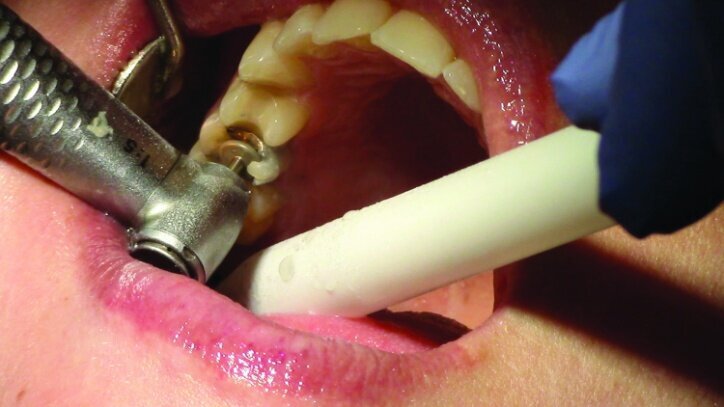
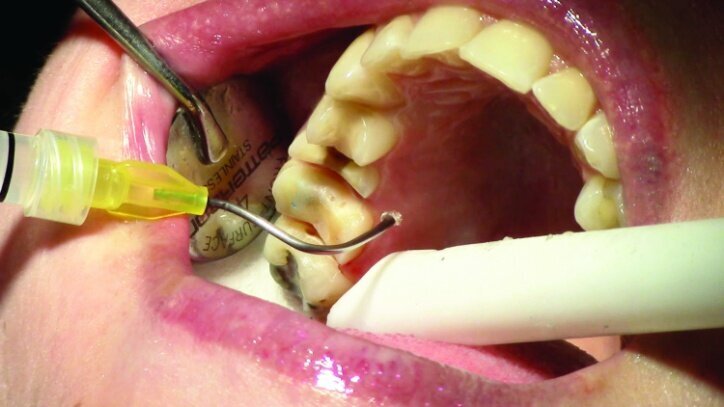
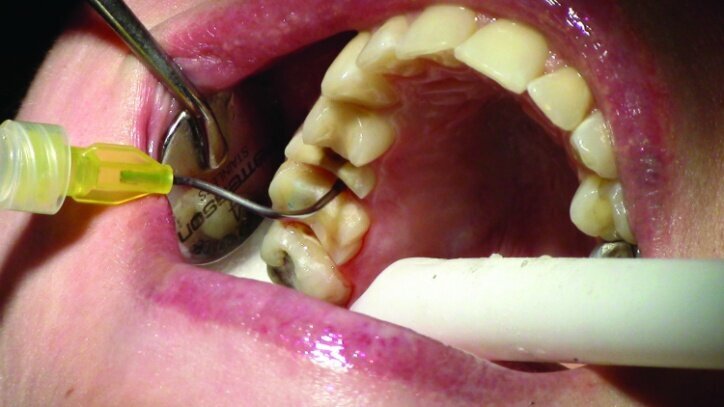
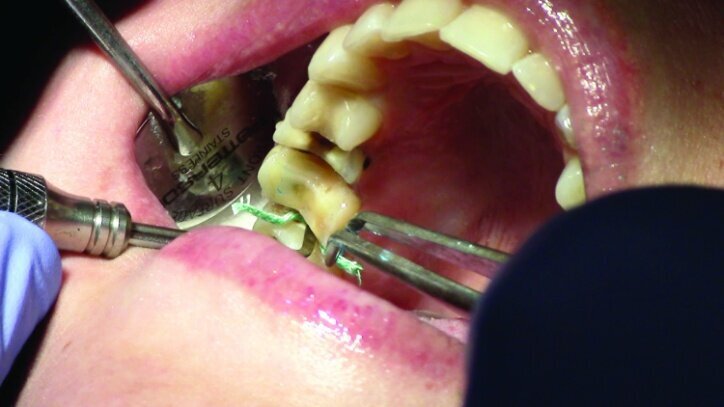
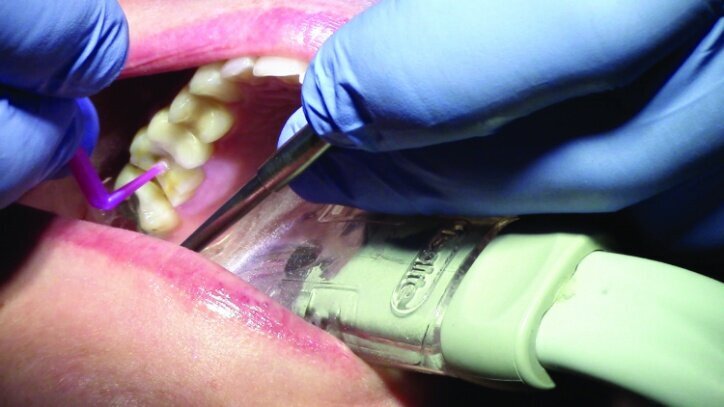
Tissue management was obtained with ViscoStat Clear, gingival haemostatic gel, 25 percent (m/m) aluminum chloride (Figs. 16 & 17). Gingival retraction was obtained using a two-cord system. First, a #00 size cord from Ultradent was placed on the mesial and distal of both preparations (Figs. 18 & 19).
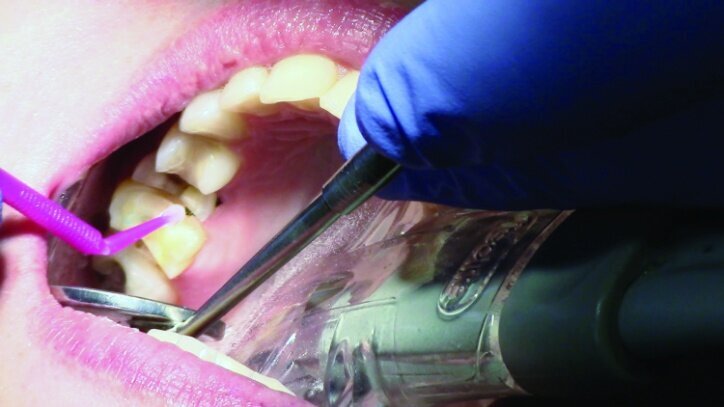
Additional haemostatic gel was used prior to the second cord. The second cord was #2 size cord from Ultradent (Figs. 20 & 21a). A minimum of four minutes with both cords in place is needed for adequate retraction of the soft tissue (Fig. 21b).
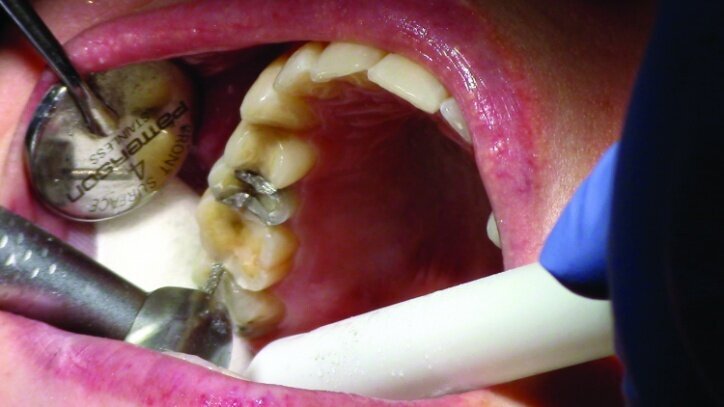
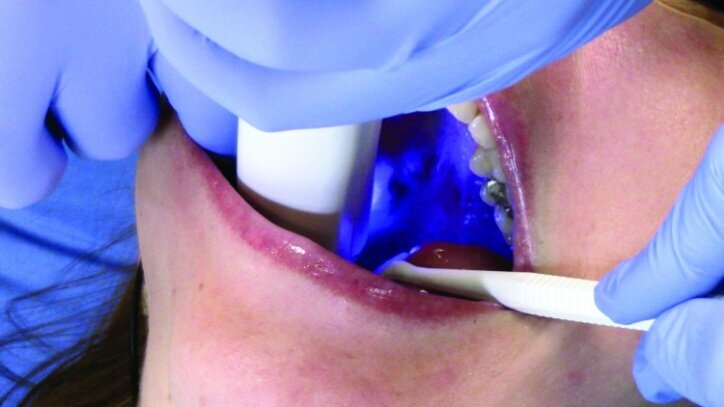
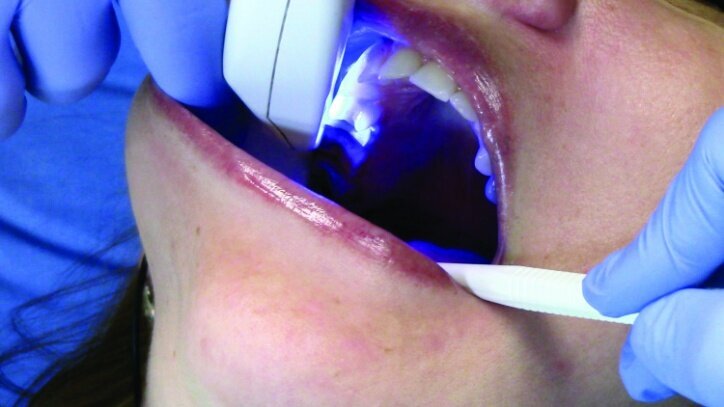
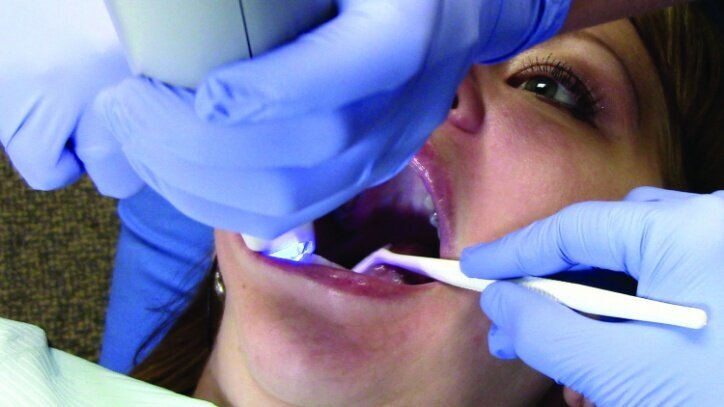
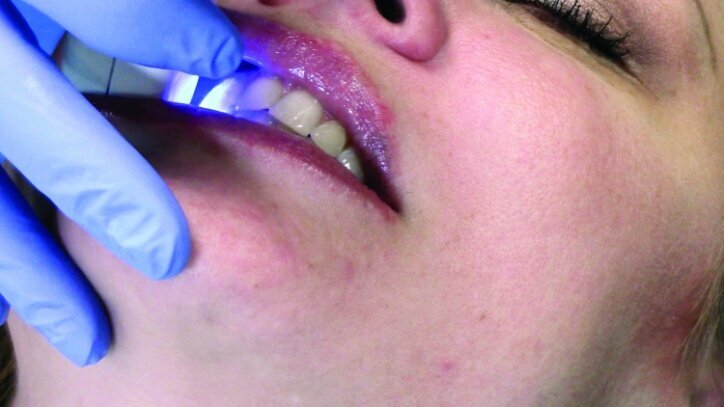
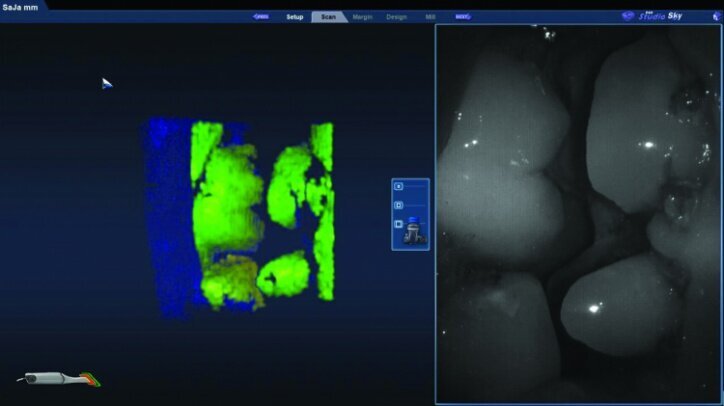
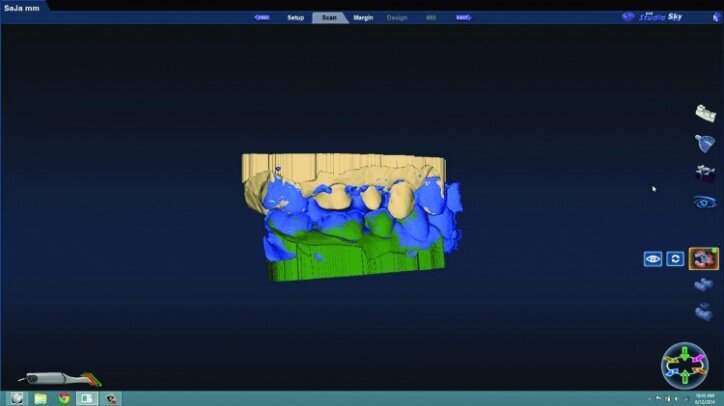
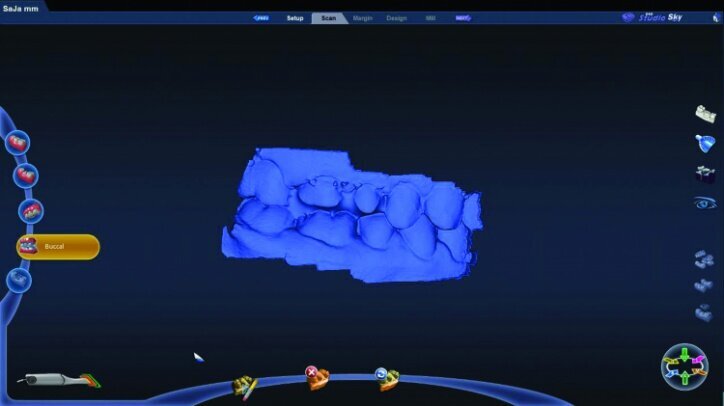
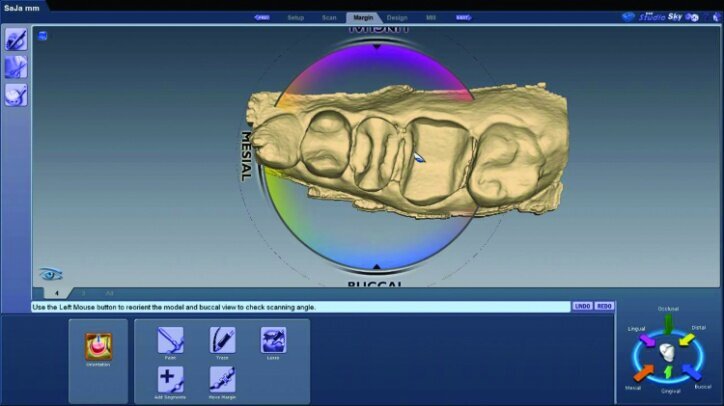
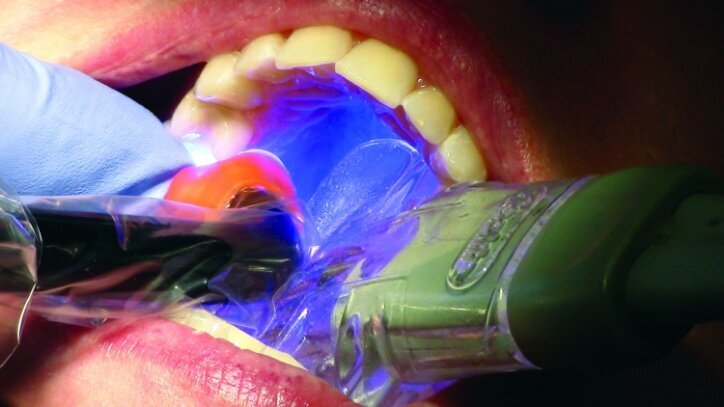
While waiting four minutes for gingival retraction, the opposing teeth were scanned with the PlanScan wand to create a digital model (Figs. 22a–24c). The buccal surfaces were then scanned with the teeth fully occluded in maximum intercuspal position. This scan was used along with the scan of the preparations and the opposing teeth to create a model for the occlusion (Figs. 25a–26c).
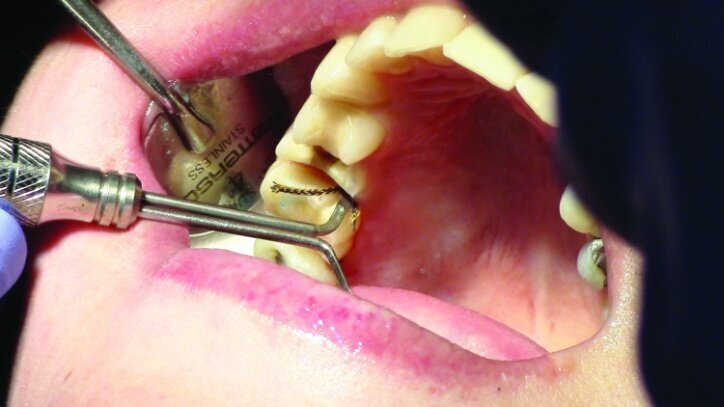
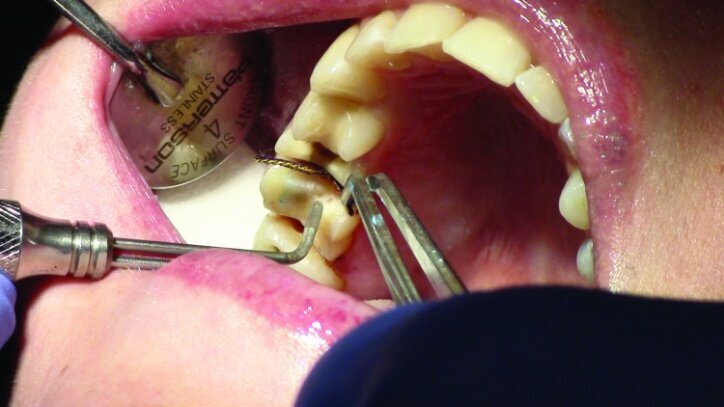
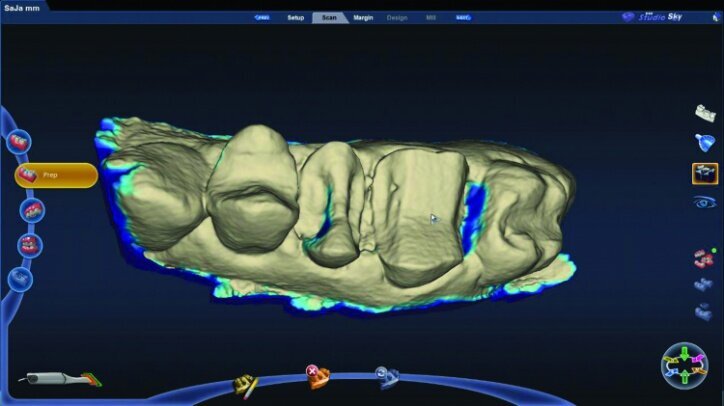
Prior to scanning the prepared teeth, the second cords were rinsed and removed. The cords were left wet to lower the risk of disturbing the tissue upon removal. The #00 cords were left in place during the scanning of the preparations, and the teeth were dried to allow accurate scanning.
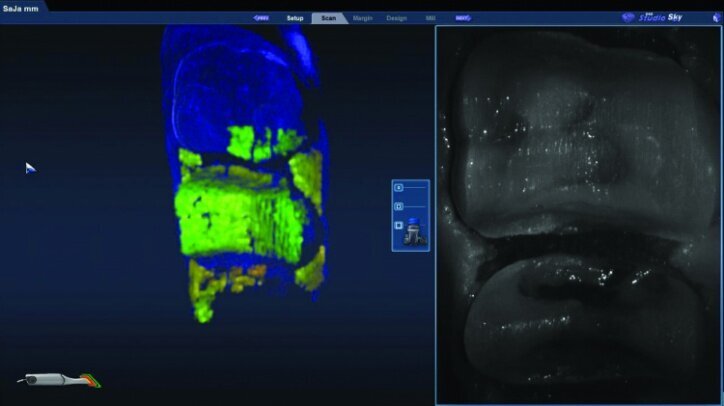
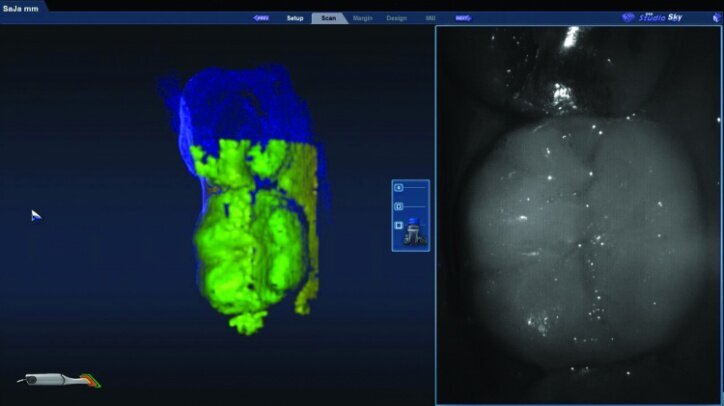
The preparation model was examined in data density view to verify adequate data was obtained during the scanning of the preparations (Fig. 26c).
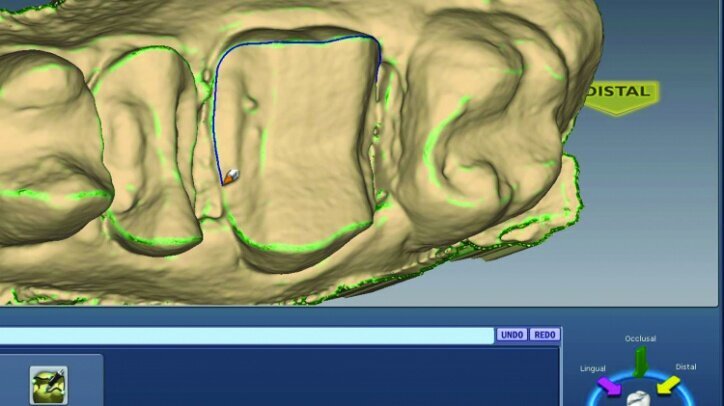
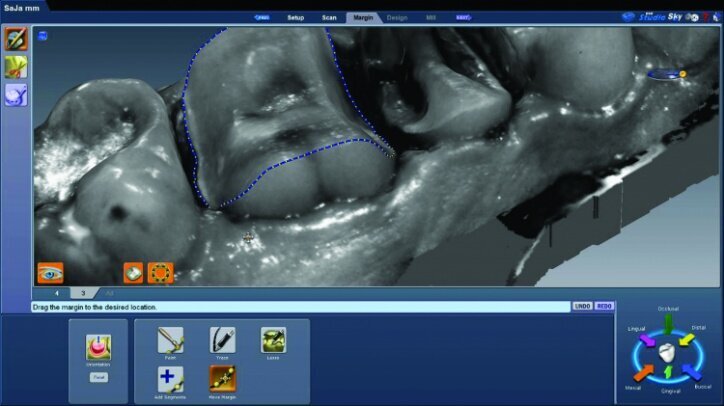
Any areas lacking adequate data were scanned further until adequate data was obtained. Next, orientation of the preparation model was performed (Fig. 26d). Orientation is for optimal design, not path of insertion. The margins were then traced and viewed in ICE mode, which provides a rendering of the scanned images for a clear view of the margins, teeth and tissues (Figs. 26e, f).
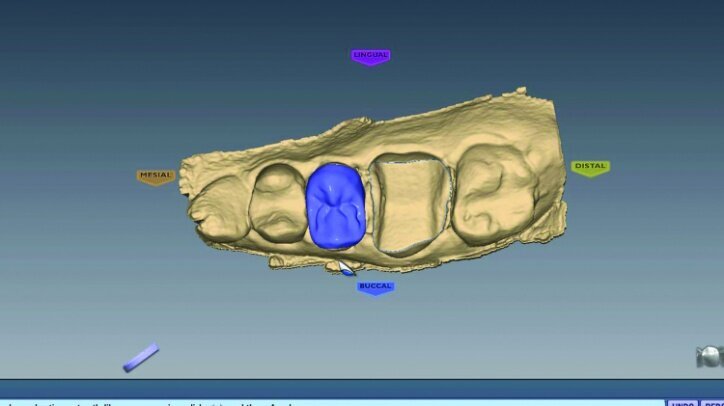
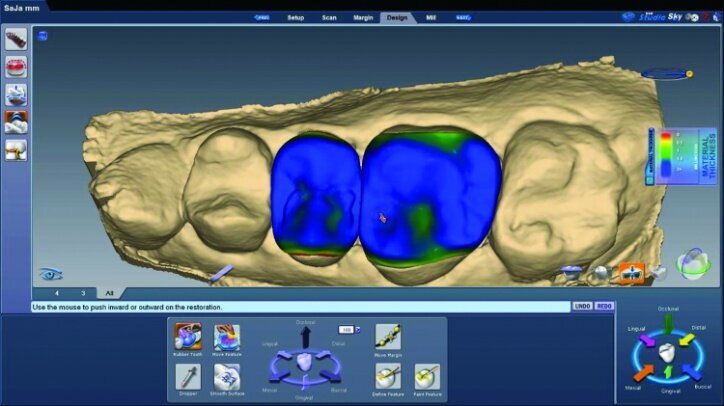
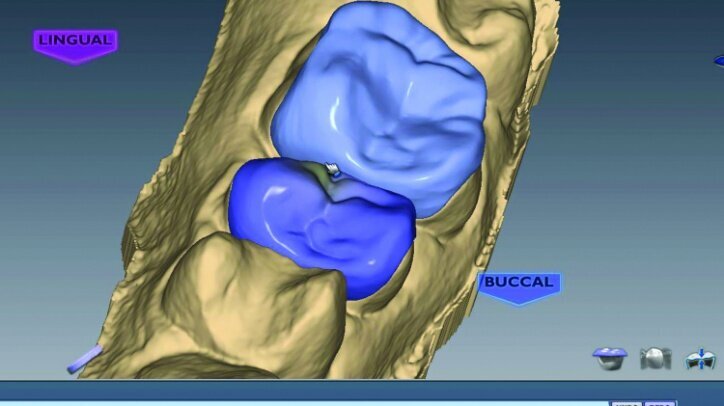
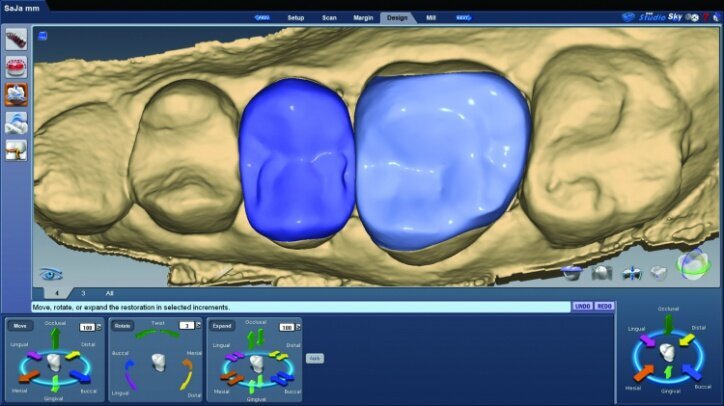
The initial proposals for the restorations were made using Library A and autogenesis, which is morphogenesis of the library tooth with the neighbouring teeth (Figs. 26g–i).
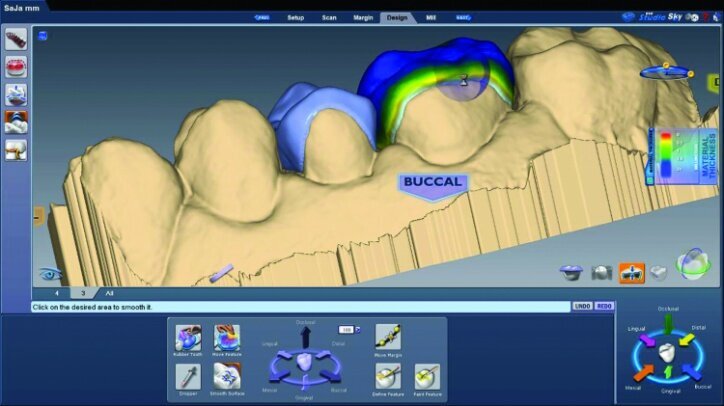
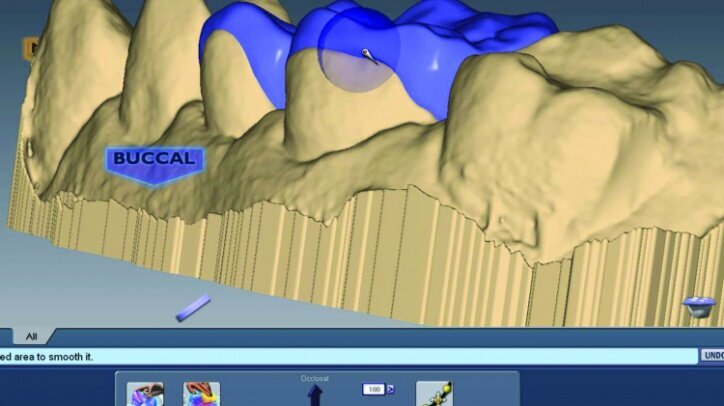
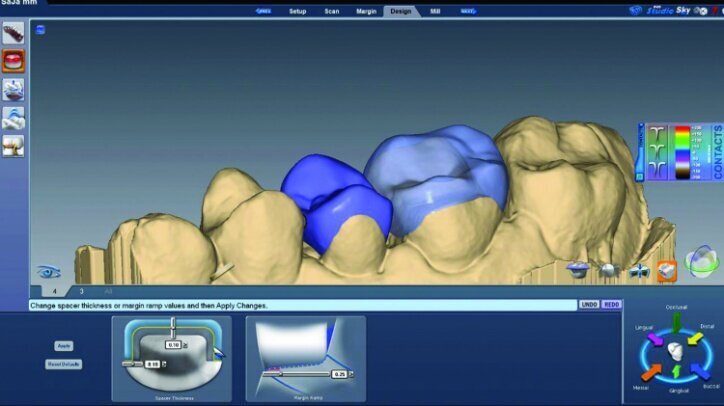
Material thickness of the proposed restorations was checked (Fig. 26j, k). Tools were then utilized to improve the initial proposal to the desired result. The rubber tooth tool was used to make minor adjustments to the anatomy (Figs. 26l–n). The smooth surface tool was used to smooth the surfaces (Figs. 26o, p).
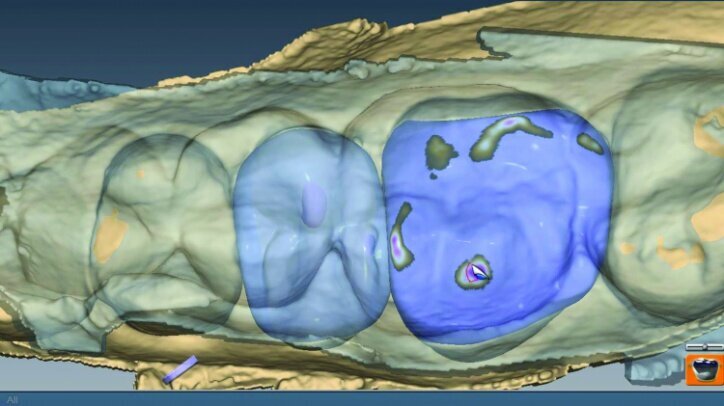
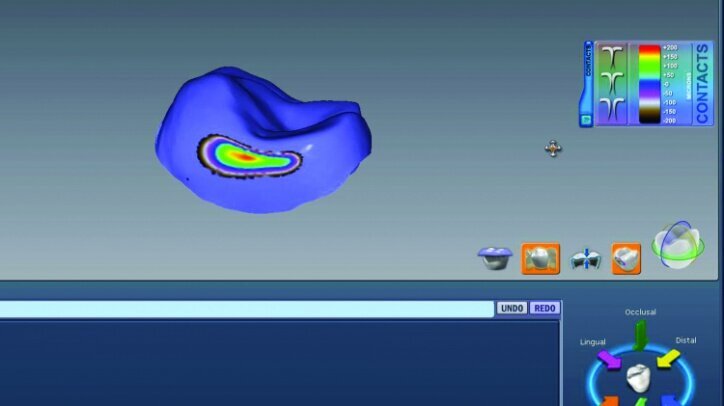
The location and strength of the occlusal contacts were checked and adjusted (Fig. 26q). Interproximal contact strength and location was then verified and adjusted as needed (Fig. 26r).
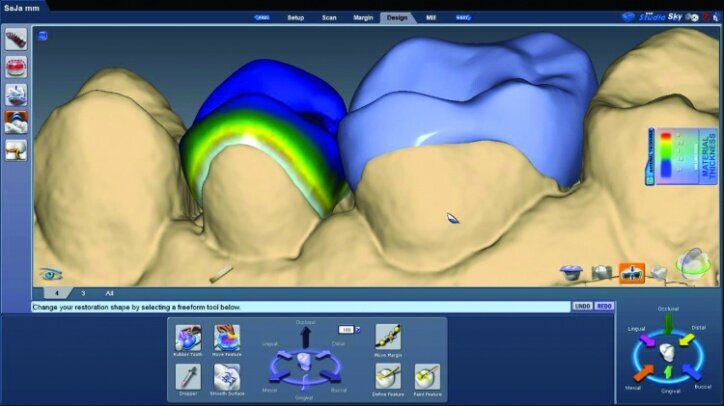
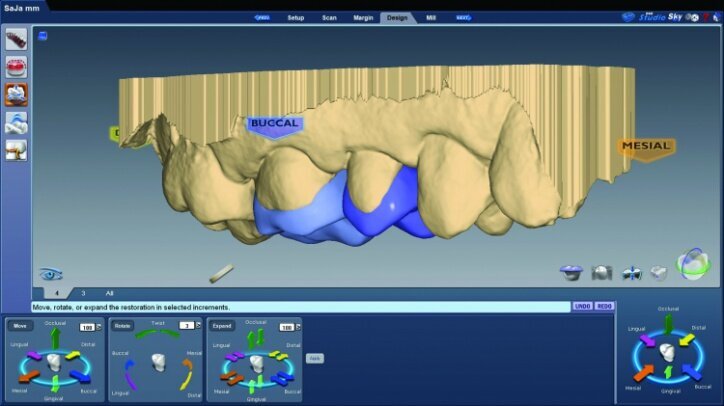
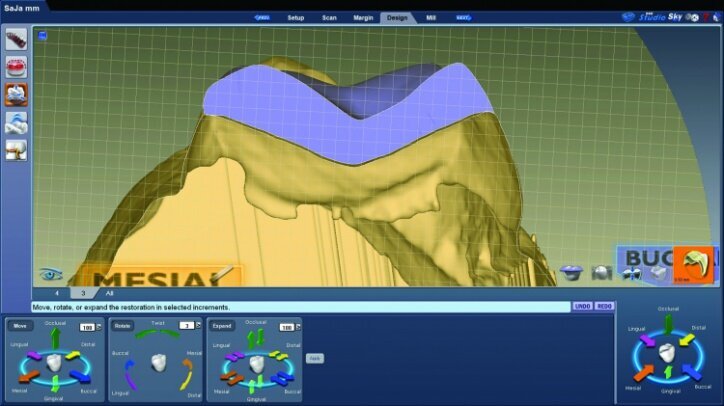
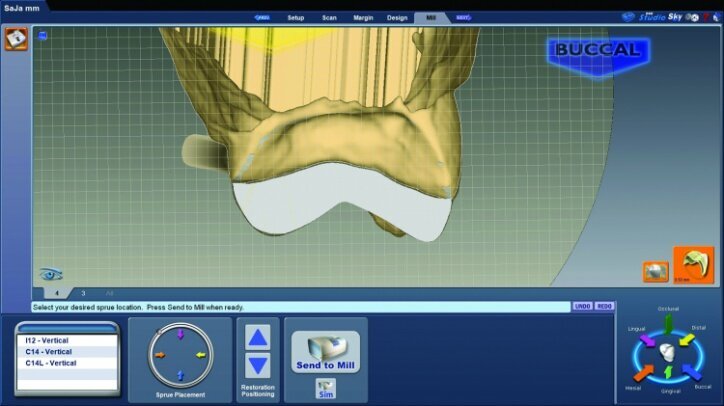
The final proposals were then verified prior to milling (Figs. 26s, t, w). The slice plane view was used to check the space between the tooth preparation and the restoration (Figs. 26u, v).
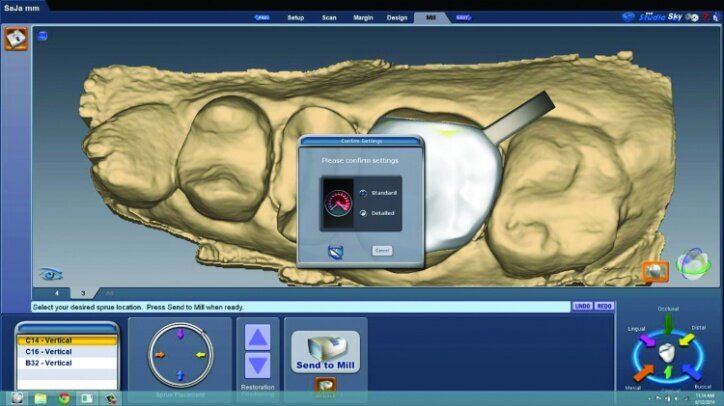
This is done to check for possible areas that may prevent the final restoration from completely seating on the preparation or for areas that may be over milled. Over-milling reduces the thickness of the material. This view also illustrates the lack of preparation on the axial wall and the minimally invasive approach taken. The location of the sprues were noted and adjusted as needed in the milling preview (Fig. 26x).
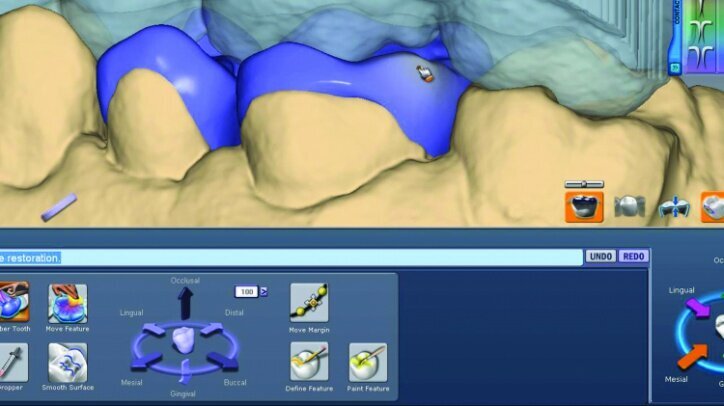
The fit of the restorations was then verified intraorally prior to final seating (Figs. 26y, z). Occlusion can be verified intraorally with e.Max CAD prior to crystallization and any staining and glazing. Checking occlusion with Empress CAD blocks prior to bonding in place is not recommended.
The restoration for #3 was then glazed and crystallized in a Programmat CS2 furnace (Ivoclar Vivadent). The restoration was allowed to cool to room temperature upon completion of glazing and crystallization. The restoration was then cleaned with a steam cleaner. Five percent hydrofluoric acid was used to etch the e.max restoration for 60 seconds. The Empress restoration was etched for 20 seconds.
The etchant was rinsed with a steam cleaner. Ivoclean (Ivoclar Vivadent) was applied for 20 seconds on both restorations to clean their internal surfaces. Monobond Plus primer (Ivoclar Vivadent) was applied to the internal surface of the restorations for 60 seconds. The primer was lightly air dried after 60 seconds, taking extra care not to allow primer on the outside surfaces of the restorations.
The teeth were isolated using Isolite (Fig. 27). Multilink Primer A/B was scrubbed onto the entire bonding surfaces using a microbrush for 30 seconds. Excess material was dispersed with blown air until the mobile liquid film was no longer visible, leaving a glossy appearing surface (Figs. 28 & 29).
An OptraStick Application Aid (Ivoclar Vivadent) was used to seat the restorations on the teeth because onlays and partial crowns can be difficult to handle. Initial tack curing was completed using a Bluephase curing light (Ivoclar Vivadent) for three seconds at each interproximal area. The resin was then removed easily using a 36/37 scaler from Brasseler. Liquid Strip (Ivoclar Vivadent), a glycerine gel that prevents an oxygen-inhibited layer of the resin cement, was applied to the margins prior to final curing (Figs. 30 & 31).
Final curing of the restorations was then completed (Fig. 32). The initial #00 cords were removed after final curing so proper tissue management could be maintained until curing was completed.
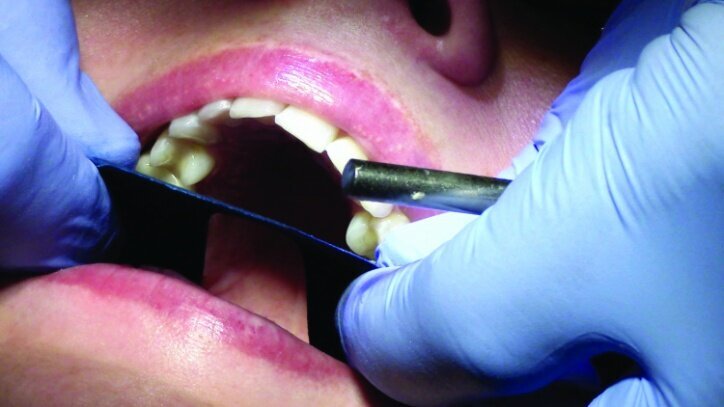
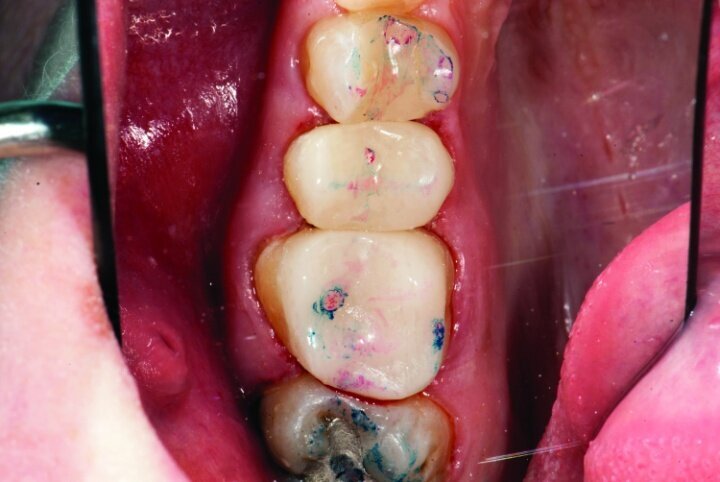
Occlusion was checked with the patient chair at a 45-degree angle. Bausch articulating paper, horseshoe shape, 200 microns thick, was used first, and the patient was instructed to chew on the paper as if chewing gum. Next, the patient was instructed to tap straight up and down on red Troll Foil articulating foil. Any marks from the chewing strokes that weren’t covered by the red paper were removed to eliminate interferences and reduce the risk of material fracture (Figs. 33a–c).
The restorations were then polished (Fig. 34). For #3 e.max restoration, the burs were NTI Cera Glaze—green, blue and yellow, in order. The green prepolisher was not used on the Empress restoration for #4.
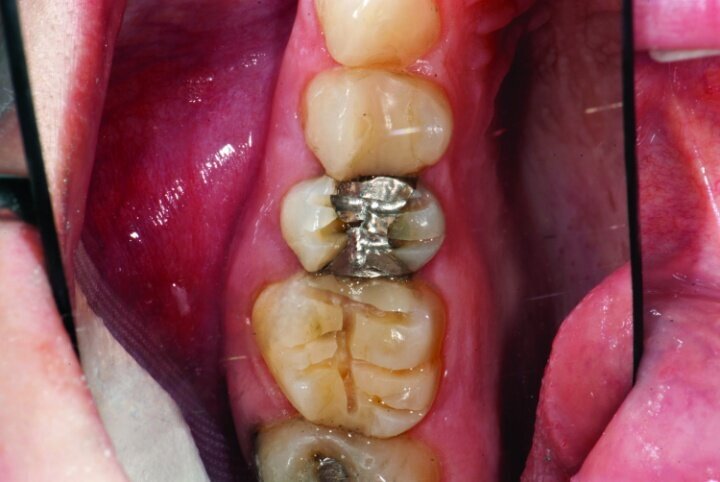
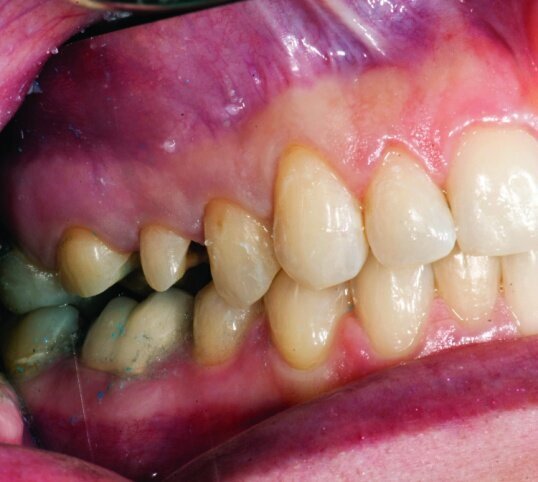
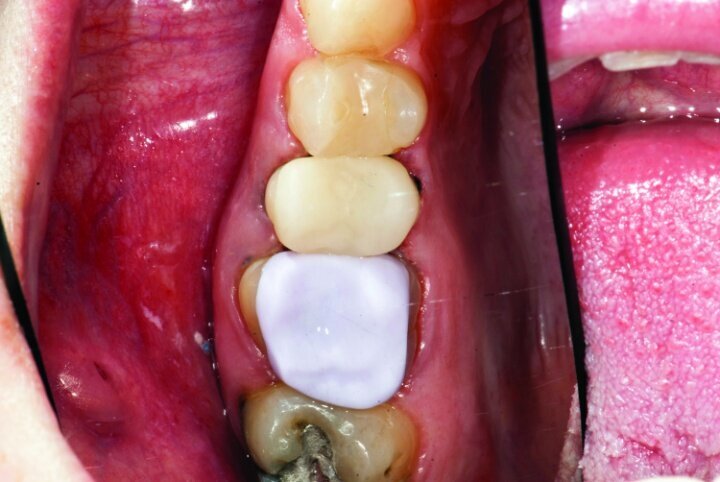
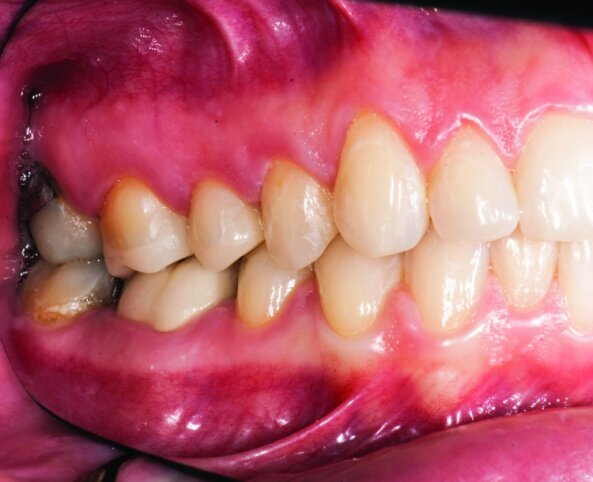
The final result was minimally invasive restorations that appear and function naturally, while decreasing risk of tooth fracture, and minimize further risk to the teeth. (Figs. 35a–36b).
Editorial note: This article was published in CAD/CAM - international magazine of digital dentistry 1/2015. A full list of references can be obtained from the publisher.
Introduced in 2023, the Invisalign Smile Architect is an effective orthodontic and restorative treatment planning software on the Align digital platform. ...
Dynamic real-time surgical navigation digital imaging, diagnostics and impressions, and the use of computer-aided design/computer-aided manufacture ...
Minimally invasive—the most well-known oxymoron in dentistry—is probably nowadays considered the new standard of care in almost every field of dental ...
A free webinar on 19 June will offer participants an opportunity to learn about how to implement orthodontic treatment as a fundamental tool in the context...
CHICAGO, U.S.: A recent study conducted by the American Association of Endodontists (AAE) has found that Americans believe there is much worth saving. ...
Implant placement in the atrophic posterior maxilla is a challenge. Bone augmentation (sinus floor elevation) is very often indicated. [1] When the ...
A 42-year-old male patient presented to our practice hoping to improve his smile. He was conscious of the worn dentition of the maxillary anterior sextant ...
Despite rapid advancements in digital cariology and biomaterials, a translation gap remains between modern clinical capabilities and resources and the ...
Minimally invasive dentistry is on a continual path to finding new and more effective ways to preserve original tissue. This approach to dentistry offers ...
MADRID, Spain: The International Society for Minimum Intervention Dentistry (MIS) has recently announced that it will be holding its first international ...
Live webinar
Mon. 20 July 2026
12:00 pm EST (New York)
Dr. Filippi Nicolás Federico
Live webinar
Wed. 22 July 2026
1:00 pm EST (New York)
Live webinar
Thu. 23 July 2026
2:00 pm EST (New York)
Dr. Crystal Marruganti, Cat Edney
Live webinar
Thu. 23 July 2026
2:00 pm EST (New York)
Live webinar
Mon. 27 July 2026
4:00 am EST (New York)
Live webinar
Fri. 31 July 2026
12:00 pm EST (New York)
Live webinar
Mon. 3 August 2026
8:00 pm EST (New York)
Dr. Cameron Shahbazian DMD MBA

 Brazil / Brasil
 Canada / Canada
 Latin America / Latinoamérica
 USA / USA
 Austria / Österreich
 Bosnia and Herzegovina / Босна и Херцеговина
 Bulgaria / България
 Croatia / Hrvatska
 Czech Republic & Slovakia / Česká republika & Slovensko
 France / France
 Germany / Deutschland
 Greece / ΕΛΛΑΔΑ
 Hungary / Hungary
 Italy / Italia
 Netherlands / Nederland
 Nordic / Nordic
 Poland / Polska
 Portugal / Portugal
 Romania & Moldova / România & Moldova
 Slovenia / Slovenija
 Serbia & Montenegro / Србија и Црна Гора
 Spain / España
 Switzerland / Schweiz
 Turkey / Türkiye
 UK & Ireland / UK & Ireland
 China / 中国
 India / भारत गणराज्य
 Pakistan / Pākistān
 Vietnam / Việt Nam
 ASEAN / ASEAN
 Israel / מְדִינַת יִשְׂרָאֵל
 Algeria, Morocco & Tunisia / الجزائر والمغرب وتونس
 Middle East / Middle East


 Dr. Crystal Marruganti, Cat EdneyRegister now1CELive webinar
 Federico ZunicaRegister now1CELive webinar
 Dr. Sergio FlorencioLive webinar
 Dr. Cameron Shahbazian DMD MBARegister now1CE


To post a reply please login or register