The widespread use of intraoral optical impressions and constant improvements in dental computer-aided design (CAD) software today allow the practitioner to manage various kinds of clinical situations, from the simplest to the most complicated, by using different types of dedicated equipment (camera software, processors and, more recently, 3D printers) as part of a completely digital workflow.[1] Arch scanning methods using intraoral scanners yield impressions that are comparable to those obtained with traditional equipment in terms of clinical precision [2] because they eliminate the variations caused by the user, reduce the readjustment processing time and costs, and improve patient satisfaction and comfort.[3, 4]
It is customary to distinguish direct computer-aided design/computer aided manufacturing (CAD/CAM), in which all the stages (optical impression, CAD, CAM) are undertaken in the practice, from the semi-direct method, in which a digital impression is sent via the Internet to the dental technician for fabrication. When crowns and bridges are produced using semi-direct CAD/CAM, this usually includes the use of a temporary prosthesis. The temporary bridge is retained while the definitive prosthesis is fabricated in the laboratory. This helps in terms of maintaining aesthetic and functional factors, and in the event of adaptations to vital teeth, it protects pulp vitality and reduces inter session sensitivity. The therapeutic goals of temporary CAD/CAM readjustments are similar to those of conventional fabrication techniques. [5] The transitory fixed prosthesis is designed to enhance aesthetics, stabilisation, and/or function for a limited period, after which it is replaced by a definitive prosthesis.
Fig. 1: Pre-scan for temporary restoration. Three-dimensional proprietary formats DCM (3Shape) and CDT (Sirona) can be imported in STL format in exocad open software after conversion and exported for fabrication (3D printing or milling) of the provisional restorations.
Fig. 2: TRIOS 3 color (3Shape) pre-scan.
Fig. 3: Bonding of a fibre-reinforced composite post under a rubber dam (LuxaCore Dual, DMG).
Fig. 4: Creating eggshell temporaries for tooth #45 with the exocad provisional module.
Fig. 5: 3D printing of the temporary crown with E-Dent 400—
biocompatible, CE-certified Class IIa (described as generally invasive products with a short-term application, validated up to one year in the mouth by the manufacturer) and 3D printed support structure.
Fig. 6: Temporary crown on tooth #45 set in the mouth.
Fig. 7a: 3D printed model for fabrication of the stratified zirconia crown in the laboratory (a). Zirconia crown set in the mouth (b).
Fig. 7b: 3D printed model for fabrication of the stratified zirconia crown in the laboratory (a). Zirconia crown set in the mouth (b).
Fig. 8: Initial clinical situation: tooth #31 is missing.
Fig. 9a: Positioning of the insertion angle of the future preparation (a). Adjustment of the thickness of the walls of the temporary bridge (b).
Fig. 9b: Positioning of the insertion angle of the future preparation (a). Adjustment of the thickness of the walls of the temporary bridge (b).
Fig. 10: Temporary FDP milled (dentallgroup.eu).
Fig. 11a: Preparation of vital teeth #31 to 42 bridge abutment (a). Digital impressions (CEREC 3.85) (b).
Fig. 11b: Preparation of vital teeth #31 to 42 bridge abutment (a). Digital impressions (CEREC 3.85) (b).
Fig. 12: Trial of temporary bridge,
milled with PMMA Tempomill Vario (ZMT).
Fig. 13a: Anterior temporary crown printed using a preliminary CEREC 3-D Redcam impression. CAD of the IPS e.max FDP on CEREC inLab 4.3 (a).
Bonded IPS e.max bridge (b).
Fig. 13b: Anterior temporary crown printed using a preliminary CEREC 3-D Redcam impression. CAD of the IPS e.max FDP on CEREC inLab 4.3 (a).
Bonded IPS e.max bridge (b).
Fig. 15a: Design of the provisional prosthesis, margins set; the irregular initial state of
tooth #22 could be adjusted virtually (a). 3D PICO2 printer (b).
Fig. 15b: Design of the provisional prosthesis, margins set; the irregular initial state of
tooth #22 could be adjusted virtually (a). 3D PICO2 printer (b).
Fig. 16: With 3D printing, different shapes of the same tooth can be printed at the same time without additional time or cost.
Figs. 17a & b:
Temporary crown printed in 3D set in the mouth (a). Temporary printed restoration after glossing (b).
Fig. 18a: Zirconia crown on a printed model (a). Crown set in the mouth (b).
Fig. 18b: Zirconia crown on a printed model (a). Crown set in the mouth (b).
Fig. 19: Virtual simulation on Meshmixer: mirror 3D duplication of initial situation of teeth #21, 22, 23 and 24 to replace teeth #11, 12, 13 and 14.
Fig. 20a: SLA 3D printers presented at the 2017 IDS: XFAB printer (a) and Formlabs’ Form 2 printer (b).
Fig. 20b: SLA 3D printers presented at the 2017 IDS: XFAB printer (a) and Formlabs’ Form 2 printer (b).
Fig. 21a: 3D printing with Form 2 resin for a complete removable prosthesis (denture base and denture teeth). Denture tooth resin is used for both prosthetic teeth for removable prostheses and temporary teeth.
Fig. 21b: 3D printing with Form 2 resin for a complete removable prosthesis (denture base and denture teeth). Denture tooth resin is used for both prosthetic teeth for removable prostheses and temporary teeth.
Fig. 22: Choice of shade and position of the graduation for a three-unit posterior bridge.
Fig. 23: Fully digital workflow for temporary 3D printed crown
manufacturing. Dental treatment (caries treatment, root canal therapy, post and core, etc.) can be done during 3D printing of the temporary crown.
Often, such prostheses are used to assist in the determination of the therapeutic effectiveness of a specific treatment plan or the form and function of the planned definitive prosthesis. The following requirements need to be met:
biological requirements: protect the dental pulp; maintain and contribute to periodontal health; provide a comfortable, functional occlusal relationship; maintain tooth position; and protect remaining tooth structure;
mechanical requirements: resist functional load and resist removal forces without fracturing;
aesthetic requirements: resemble natural teeth (chameleon effect) and achieve the stability of the shade at that time.
The materials used in CAD/CAM are more fracture-resistant than the resins used chairside; [6, 7] they are extremely aesthetic in aspect and afford repair or modification directly at chairside. [8] The ability to produce temporary prostheses with optimal, more predictable adjustment margins is of the greatest interest from the aspects of plaque control, gingival health and protection of residual dental structures. The respect of limits, aesthetics and the choice of sufficiently resistant restorative materials are important factors to take into account, especially during mid- or long-term temporary aesthetic restoration. [9]
In conventional techniques, a crown or a bridge can be prepared, that is, undertaken before the teeth are made, based on a wax-up or self-casting, using an impression taken prior to preparation. Transposed to CAD/CAM, this demands 3-D digital recording of the initial clinical situation with the aid of an intraoral scanner. This article puts forward a modern, routine development in the management of CAD/CAM-produced temporary teeth based on three clinical case studies: one using a subtraction method (milling) and the others using an additive method (3-D printing).
In the milling method (subtraction), the volume is reduced (block or disc) until the shape required is achieved. Three-dimensional printing is an additive method by the deposit of successive layers until the final shape is achieved. Stereolithography (SLA) was invented in the 1980s and involves the hardening of liquid light-cured resin placed in a tray by photopolymerisation, using a laser that builds the object up layer by layer. A similar 3-D printing technology used for the fabrication of temporary dental crowns is known as digital light processing (DLP), which uses a projector instead of the laser. The digital projection of the 3-D shape of the tooth on the liquid resin allows superimposition of successive layers by light-curing the resin. It is one of the most precise 3-D printing methods. [10]
For the past few years, 3-D printing has been used in various areas of dentistry: [11]
surgical guides, [12]
model manufacture, [13–15]
manufacturing of burn-out resin or wax pieces for the lost-wax method, [16]
anatomical models for the planning of surgery or for educational purposes, [17, 18]
aesthetic prototypes (mock-up),[1]
removable prostheses.[19]
Quite recently, the materials used in the 3-D printing of temporary crowns and bridges have been marketed and are now being used successfully alongside intraoral scanners. [20] The purpose of this article is to demonstrate the usefulness of rapid prototyping for the realisation of temporary dental restorations from preliminary optical impressions gained using intra-oral scanners. We implemented this method using two scanners: a last-generation (2016) scanner (TRIOS 3 color, 3Shape) for Case 1, and a previous generation (2008) scanner (CEREC 3-D Redcam, Sirona) for Cases 2 and 3 (Fig. 1).
We describe the workflow to obtain an open STL file format of the final restorative design from proprietary format files, CDT for the CEREC 3-D scanner and DCM for the TRIOS scanner. We show that these files can be either milled or 3-D printed to produce the final prosthesis.
After the presentation and comparison of the two fabrication techniques based on three clinical case studies, we will discuss which materials are available for 3-D printing, in which type of printer they can be used, and the advantages we might draw from both case studies by manufacturing provisional prostheses prior to the preparation of the teeth.
Conventional methods for fabrication
Practitioners habitually use several methods to fabricate provisional prostheses: [21]
They preform custom crown shells (cellulose acetate or polycarbonate forms).
They customise resin restorations by different techniques:
direct technique assisted by a matrix (elastomeric or alginate impression or vacuum-formed plastic template) or by using a custom-carved technique (block temporary); or
indirect technique with the help of a laboratory that delivers an almost finished restoration (which will be relined and readapted in the mouth) from an impression of the clinical situation; this needs an impression preparation and antagonist arch and, often, a method for registering the occlusion.
Materials used for provisional restorations produced by conventional methods involve various polymers: polymethyl methacrylate (PMMA), poly(ethyl methacrylate) (PEMA), and bis-GMA light-polymerised urethane dimethacrylate (UDMA).
Direct methods are often very quick to implement, but a number of studies have shown better quality of restoration by indirect methods:
It is known that fabricating provisional crowns by the indirect technique produces more acceptable marginal adaptation than do other techniques. [22]
Chairside time is reduced because most of the procedures are completed before the patient’s visit.
Less heat is generated in the mouth because the volume of the resin used is small. The amount of heat generated and transferred to the pulp chamber, however, may be sufficient to cause thermal damage to the pulp and odontoblasts. The temperature rises in the pulpal chamber during fabrication of provisional resin crowns. [23]
Contact between the resin monomer and the soft tissue is minimised compared with the direct procedure.
There are fewer final occlusal or aesthetic corrections. In the case of aesthetic or multi-unit restorations, the indirect fabrication of a provisional prosthesis becomes almost compulsory.
Case presentation
For 3-D printing, the final CAD files of the restoration must be in open STL format to be printed. In our report, we describe that the workflow is similar regardless of the intraoral scanner used (new or old generation).
Case 1: Temporary 3-D printed posterior crown (on a Perfactory Vida high-resolution printer, EnvisionTEC) based on a preliminary impression with a TRIOS 3 color intraoral scanner.
Initial situation and preliminary treatment
In a 37-year-old patient, necrosis under a composite led to loss of the vitality of tooth #45 owing to caries. The missing tooth structure did not affect the entire morphology of the tooth, and we wanted to realise a zirconia core structure layered with aesthetic porcelain, a viable option for opacity in cases of stained, devitalised teeth. This restoration would be sealed just after the intervention and during the necessary laboratory phase.
We took a preoperative scan (pre-scan) of the initial situation with TRIOS 3 color to produce a temporary crown using a 3D printer (Fig. 2). The impression (in DCM format) was transferred to the cloud via 3Shape Communicate to be converted into STL format. The pre-prosthetic treatment involved a root canal therapy and the setting of a fibre reinforced composite post under a rubber dam (Fig. 3).
Fabrication of the provisional prosthesis with a 3-D printer
A provisional prosthesis was made according to the shape of the tooth in the pre-scan, using the provisional eggshell module of exocad software (exocad; Fig. 4). The temporary crown was fabricated with the Perfactory Vida printer (Fig. 5) and fixed in the mouth with temporary cement (Fig. 6). After the base had been removed, the temporary crown was relined and adapted in the mouth on the day of preparation.
Fabrication of the final restoration with CAD
An optical impression was taken on the day of measurement and positioning of the temporary impression. This enabled the fabrication of a zirconia coping and the stratifi- cation of the aesthetic ceramic on the printed model (Fig. 7a) and the coping was then set in the mouth (Fig. 7b).
Case 2: Temporary bridge milled in a fabrication centre from a CEREC 3-D Redcam optical impression
The aim of CEREC in the past-decade technology was to produce chairside ceramic restorations typically as single unit. The slowness of both the optical impression and the milling machine made it difficult to produce even a definitive three-unit fixed dental prosthesis (FDP) in a single appointment. The method of fabricating a provisional by pre-scan and eggshell CAD can help to temporise during the laboratory phase.
Initial situation
A 19-year-old patient came for a consultation after a fall of several meters on to a rock, which had caused fracture of the jaw and was followed by surgical implantation of an osteosynthesis titanium plate. Fractured tooth #31 had to be removed owing to this operation, causing unitary edentulism. Owing to the presence of the osteosynthesis plate, the option of an implant was rejected after a scan (Fig. 8). Six months later, the bone growth and maturation reached the terminal point and the bone became eligible for bridge application.[24]
Manufacturing of a three-unit provisional bridge
A preliminary optical impression was taken with a CEREC 3D camera to record the initial situation and to create a dental morphological base for the manufacture of the FDP. The digital CDT file was then opened with the mainstream 3-D open-source Blender software (Version 2.63.33; www.blender.org) equipped with the add-on Open Dental CAD developed by Patrick Moore for the export of the file in STL so that it can be read by exocad. The digital impression was optimised by free open-source CAD software (www.freecadweb.org) by trimming the edges to remove any artefacts created by the lower lip, which obstructs visibility. The quality of the meshing and the automatic repair functions were implemented one by one if necessary. The file was then ready to be imported into the dental exocad dental CAD software.
The client file with the patient’s name was completed, indicating the type of restoration (temporary bridge on teeth #41 to 32) and the type of materials chosen (resin). As the patient was satisfied with the aspect of the existing teeth, their morphology just had to be copied for the fabrication of the provisional prosthesis without having to present an aesthetic mock-up. The design software enabled the virtual replacement of the missing tooth. The margins of the future bridge were set out, represented on screen by movable yellow dots to create a black line. The intermediary bridge sat naturally between the two existing teeth. The bridge insertion angle was set according to the future dental preparation of teeth #41 and 32 (Fig. 9).
At this stage, the thickness of the walls of the temporary FDP, as well as the shape of the margin fit, could be programmed. The shape of the pontic and its connections were programmed to match durability and hygiene requirements.
The file was exported from exocad in STL format and then sent via the Internet to a milling centre for external fabrication (dentallgroup.eu). The shade, the type of composite resin material, and the date of delivery were selected directly on the client back office panel of the website. The fabrication and delivery time of the temporary FDP was 48 hours (Fig.10), but it could have been reduced by in-office milling.
Figure 11a shows the clinical situation with abutment teeth. The bridge constructed using the files sent to the laboratory was delivered to the practice (Fig. 11). The prosthesis was tried and adapted in the patient’s mouth on the day of preparation. This stage demanded far fewer adjustments than with conventional construction methods. Relining was necessary, but the margins adapted well.
The intraoral optical impression of the preparations was taken with the 3D CEREC camera. The file was sent by the free-access website at www.wetransfer.com to the laboratory that was equipped with the Sirona inLab 4.3 software (Dentsply Sirona). The temporary FDP was then set in the mouth with temporary cement (DentoTemp, Itena; Fig. 12).
The thickness and shape of the intermediary bond guarantee the durability of the future prosthesis. The bridge was milled in a lithium disilicate CAD block (IPS e.max, Ivoclar Vivadent) in the laboratory and then made up according to the digital photograph sent by e-mail. The final bridge was fixed according to a conventional cementing protocol with an adhesive resin. The IPS e.max FDP was fixed with a resin cement (NX3 Nexus, Kerr) and made up; the total time taken for shading and construction was one week and was to the patient’s satisfaction (Figs. 13a & b).
The main limitation of the past decade in clinical so-called “chairside” CAD/CAM dentistry was the impossibility of producing an aesthetic zirconia crown, first because the proprietary format of the files could not be converted for milling at the laboratory; second, because most of the laboratories were not able to produce a 3-D printed model; and third, because the optical impression files could not be transferred quickly and correctly to the laboratory. Currently, the new digital workflows at our disposal offer us these possibilities.
Case 3
Cases of aesthetic restoration of the smile are sometimes more difficult to comprehend when one is not reconstructing the entirety of the smile, but only one or two units. Communication with the patient is essential. Three-dimensional printing can help to better understand aesthetic desires by printing different tooth shapes.
A 32-year-old patient came to the practice because of an unsatisfactory restoration of her devitalised tooth #22 several years before using a composite material that now had taken on a dark, unattractive colour (Fig. 14). To optimise the aesthetic result, we decided to place a zirconia crown (made in the laboratory with the CAD/CAM method for the substructure and manual method for the stratification of the aesthetic ceramic) on a pressed corono-radicular restoration with a fibre-reinforced composite post.
A preliminary optical impression (CEREC) was taken to record the shape before preparation and to serve as a working base for the morphology of the provisional prosthesis. The CDT file was opened with the Blender software to be transformed into STL (Fig. 15a) and processed with FreeCAD (www.freecadweb.org) to eliminate any artefacts. Then, as previously, the provisional prosthesis was designed with exocad. The preparation of tooth #22 was done after cementing a fibre-reinforced composite post under rubber dam isolation.
Fabrication of a 3-D printed provisional prosthesis
A provisional prosthesis was made by 3-D printing on a PICO2 printer (Asiga; Fig. 15b) with NextDent Crown & Bridge A2 (Class IIa biocompatible; NextDent), validated for a 30-day in-use time frame in the mouth.
The CAD was made with exocad and several designs were made for the patient with the aim of closing, if possible, the diastema between teeth #22 and 23 in relation to the initial situation. Two provisional restorations were made for the patient (Fig. 16), and the preferred temporary tooth was polished and sealed (Figs. 17a & b).
Fabrication of a definitive crown
The final crown was made using an optical impression that enabled both the fabrication of the zirconia coping and the 3-D printed models, which enabled the stratification of the ceramic in the laboratory (Figs. 18a & b).
Discussion
The pre-scan method can be useful in situations in which temporary restorations are required even if in some cases practitioners would prefer to make a temporary crown directly after preparation. We can ponder the question of which workflow to use (in the clinic or in the laboratory), and why it would be better to print than to mill. We can also enquire which printer and materials to use. Three-dimensional printing is currently in full development in the dental field, and the print speed is increasing steadily. Next, we will discuss what we can expect in the future for daily use in the dental clinic.
Advantages and disadvantages of the pre-scan method for temporary crowns
Advantages
The principal advantage of the pre-scan method to make temporary restorations is the principle of copy and paste for the shape of the tooth. Another advantage is that, after preparation, blood can mask the limits and make optical impressions difficult. It is appealing for a single optical impression and for only minor modification of the shape of the desired tooth without modification of the occlusion.
Disadvantages
The principal disadvantage of the pre-scan method is the necessity to keep the same occlusal schema (before/ after) even if minor correction of the antagonist can be discussed and done before final restorations. Another problem is visualising and anticipating the position of the limits of the preparation, specifically in the proximal view. The curvature of the vestibulo-lingual edge in the interdental papillary zone can be difficult to anticipate when the limit is drawn on the software, especially in automatic mode. However, rebasing of the temporary restoration can correct it. We did not observe any problems of adhesion between the bis acryl resin layer and the 3-D printed resin.
However, if the gingival finishing lines of the preparation are under the gingiva, rebasing becomes compulsory. The STL conversion (whether from CDT or DCM) yields a monochromatic model, and the limits of the gingiva and tooth can thus be difficult to visualise.
Which workflow to use?
The method of prototyping that we have described from a pre-scan offers several possibilities for producing temporary restorations, if they do not have to be made in the session:
in-office milling or laboratory milling;
in-office 3-D printing or laboratory 3-D printing.
It depends on the inter-session time and the investment to be made.
The import of digital scan files into open software such as exocad offers the possibility of using an older scanner such as the CEREC 3-D Redcam after conversion of a native CDT to STL format and overcomes the limited functions of the software whether for the realisation of a provisional prosthesis by pre-scan or a bridge.
The latest version of Sirona inLab CAD (SW 16.0) is (to our knowledge) not yet able to create temporaries from pre-scans. The add-On Open Dental CAD of Blender allows transformation to CDT (Sirona) format only into STL. The Datakit CrossManager software can transform not only CDT files but also DCM (3Shape) files into STL.
Now, TRIOS intraoral scanner users can export STL file digital impressions directly from their TRIOS Dental Desktop software. Digital provisional crown design can also be done in 3Shape Dental System but with annual licence fees. A free and original open-source method is to use STL files, as well as the Christian Brenes tooth library in Meshmixer (Autodesk, Fig. 19), which turns this free programme into dental CAD software able to perform after a few manipulations the same operation as described on a preoperative STL scan model.25 Other interesting manipulations on the initial numerical impression model, such as the Mirror function, can be performed for aesthetic simulation, numerical wax-up, mock-up or provisional restorations. A numerical dental model from an optical impression can be matched with high-quality 3D face scanning (Bellus3D) for good aesthetic integration.
Advantages of CAD/CAM provisional restorations and additive manufacturing
Temporary restorations can now be made in the dental practice by methods employing subtraction or addition; of course, we wonder which technique we should use. Is 3-D printing the best solution?
At this time, no study has compared 3-D printed resin material to CAM resin milling, but CAD/CAM-fabricated provisional crowns have demonstrated superior fit and better strength than have direct provisional crowns (Protemp, 3M ESPE). CAD-Temp (VITA Zahnfabrik) and Telio CAD (Ivoclar Vivadent) are more often used in-office for milling provisional restorations.26 CAD/CAM-milled polymers offer a wider range of translucency and chameleon effectthan manually polymerised temporary materials do [27] and have shown more favourable mechanical properties. CAD/ CAM-fabricated FDPs exhibit a higher mechanical strength than directly fabricated FDPs do, when manufactured from the same material. [28]
Advantages of additive manufacturing
There are many advantages to the techniques of addition compared with those of subtraction:
no change of maintenance to the rotary instruments;
noiseless during operation;
possibility of creating highly precise, complicated shapes without being limited by the size of the drill for the completion of small details;
once the cost of the printer has been covered, fabrication costs are much lower than when milling: no waste of materials after the milling of blocks;
possibility of creating several prostheses simultaneously;
good surface area by the spacing of polymer layers set in an optimal manner (25–50 μm); [29]
no waste of materials; only 5 per cent of additional material is used for the support, whereas with milling, around 70 per cent of the material remains unused 30—also it is possible to reuse any remaining material;
for the most sophisticated printers, various materials can be used together during the same printing;
possibility of integrating various shades.
Disadvantages of additive manufacturing
Disadvantages in comparison with the techniques of subtraction should be equally considered:
The printed objects have to be hardened in a UV box after 3-D printing, and then cleaned, dried, separated from the support, and finished (polishing, glossing). This post-UV treatment takes less than two minutes in the EnvisionTEC UV light-curing light-pulsing session of 2 × 5,000 flashes. The prosthesis is printed with the occlusal surface face down. The removal of any remaining print material from the support is undertaken on this side, which can lead to the need for adjustments.
The total fabrication time of a unit can be close to or over an hour, against 15 minutes for a unit produced by milling.
Integration of the 3-D printer with CAD/CAM software is an important factor to consider, ensuring that the fluidity of the digital workflow is not affected.
The initial investment, for the software and the equipment, is still quite high, regardless of whether this is for laboratories or dental clinics.
Experience in the use of these new materials is lacking, notably in terms of the temporary materials.
The variety of available materials, particularly for permanent prostheses for dental purposes, is quite limited for the time being.
The technological development of materials is much slower. The choice of these is limited to polymers at present. Materials must have the CE Class II marking if they are to be used in vivo.31–33
Machines require more maintenance and training in terms of their use and upkeep.
Three-dimensional printing and accuracy for temporary restorations
Resolution is one of the most important factors to take into account when considering different 3D printers to obtain satisfactory clinical results, particularly for fixed protheses. The resolution of a 3-D printer partly depends firstly on the technology used:
laser SLA printer: the laser spot size (50 μm on the XFAB [DWS; Fig. 20a]; 140 μm on the printer [Formlabs; Fig. 20b])
DLP printer: the quality of the screen (pixel size specification of the projector).
On fused deposition modelling (FDM) printers (the process of which entails melting plastic material and extruding it in a pattern, layer by layer, on a variable-height build platform), which is not described in our article, the machines are equipped with a nozzle measuring about 250 μm at its end.
When considering 3-D printer resolution, we also have to take all three dimensions into consideration: resolution on the planar dimensions (x- and y-axes) and the vertical resolution (z-axis) determines the thickness of a layer. On FDM machines, the smallest practical layer height is generally 0.1 mm or 100 μm, and for DLP SLA machines, 0.025 mm or 25 μm.
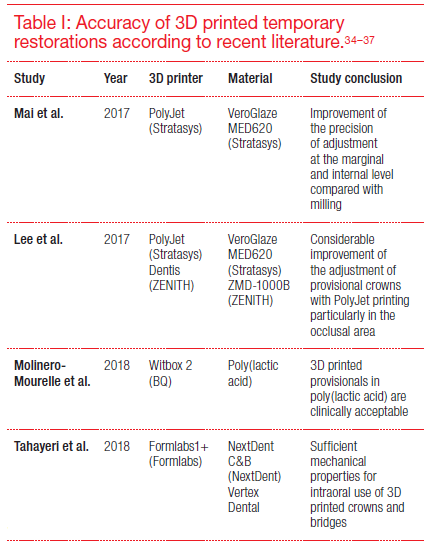
Recent studies presented in the literature have shown the accuracy and quality of 3-D printed temporary prostheses (Table I).34–37 However, accuracy must be placed in the context of our study, which entails producing only a preform intended to be rebased in the mouth.
Which materials for which printers?
Temporary materials must be used in the DLP (LED/UV) printers with a light spectrum of 378–388 μm. The factory-preset programmes included in the 3-D printer to perform the polymerisation and the material tested and validated by the manufacturer must be respected. The post-treatment protocols must be scrupulously respected too.
At present, several manufacturers offer biocompatible resin materials that can be used in dentistry:
E-Dent 100 and E-Dent 400 (A1, A2 and A3; EnvisionTEC), sold in bottles;
NextDent Crown & Bridge (NextDent) in the form of a simple resin or a micro-particle resin;
Temporis (DWS) as a liquid for XFAB (Fig. 20a) or in multicoloured cartridges for DFAB (DWS);
Freeprint Temp (A1, A2 and A3; DETAX) sold in tubs of 500 g or 1,000 g;
DWS (XFAB or DFAB) and Stratasys have launched their laboratory printers, whose products (Temporis and VeroGlaze MED 620) can be used in the mouth for up to 24 hours;
VarseoSmile Temp for Varseo S (BEGO) 3-D printer (A2, A3 and C2 resin), for crowns, inlays, onlays and veneers, as well as bridges of up to seven elements and with a pontic of a maximum width of a molar and for temporary use in the posterior or anterior region short or long term;
Planmeca has proposed a temporary material for its new DLP printer Creo;
at the 2017 International Dental Show (IDS), Formlabs (Fig. 20b) announced the launch of Class IIa biocompatible materials for the direct 3-D printing of dentures for bases (Fig. 21a) and teeth (Fig. 21b).
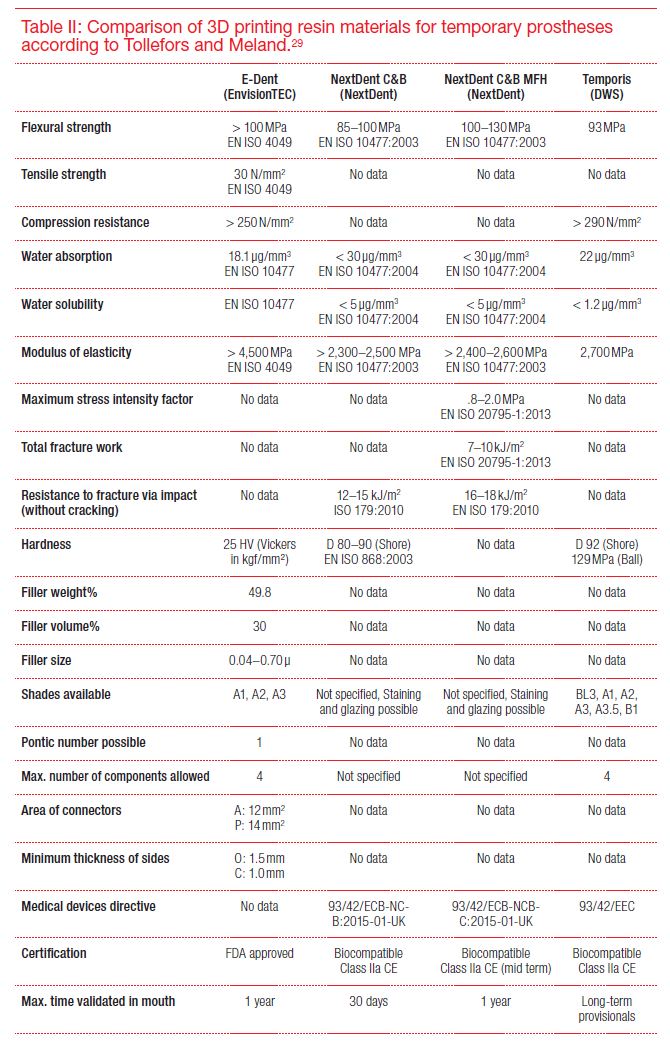
Each of these brands has developed printers for laboratories producing many components simultaneously and the fabrication of more voluminous objects requiring greater precision (models and removable prosthetic frame). Dental practices can, as indicated in the table, use them less frequently or for the fabrication of provisional or aesthetic mock-ups of less voluminous and therefore less costly printers (Table II).
Actual and future developments
Speed is a parameter that has greatly improved recently for 3-D printers. During the 2017 IDS, 3D Systems with NextDent presented a printer prototype that can produce 20 crowns in nine minutes.38
A dedicated printer for dental practices (DFAB), also presented at the 2017 IDS, allows one to define the shade to be printed (Photoshade technology) and the position of the different graduated shades (Fig. 22) to be printed and could guarantee a relatively fast, 20-minute, building time for a five-element bridge compared with a similar task in a milling machine. According to the manufacturer, the new EnvisionTEC Micro Plus cDLM printer can print eight to ten crowns in 15 minutes. With DLP technology, print time is not affected by the number of crowns printed.
All shades presented on screen are included in a single cartridge (Temporis). With this material, we can produce temporary bridges of up to five components.
Conclusion
The method for prefabrication of bridges is a new alternative using CAD/CAM and provides an answer to the demand for total dematerialisation of the digital chain and predictability of the aesthetic result, because it circumvents the need to take physical impressions. This technique also reduces adjustments if the initial project matches the preparation and simply requires temporary cementing without the use of a relining resin.
The transformation of the proprietary format to an open format means that the file can be used in the software of one’s choice (in this case, exocad) by allowing the design of a temporary bridge, as well as its transfer to a milling centre. Hence, we can benefit from all the progress made in the dental industry in terms of milling precision and the choice of materials.
The pre-management of temporary prostheses is recommended especially in simple cases (unitary restoration, small bridges without any change in the morphology or the vertical dimension between the initial and final situation). Moreover, the initial impression can be kept and reimported into the CAD software and be used as a digital base to undertake restoration. Because 3-D printing will soon be readily available, it will be possible to produce temporary bridges in-session while the practitioner prepares the teeth, thereby significantly reducing the number of sessions or the time in the chair (Fig. 23).
Hence, we suppose that 3-D printing will substitute milling for permanent prostheses in some cases and especially for the fabrication of mock-ups. A digital wax-up from an initial impression of photographs or a 3-D scan of the face and then a mock-up is much more predictable and faster to achieve, but before the technique can be used efficiently in-chair, particularly in a single session, the time required for printing and post-treatment of the prosthesis must still be reduced.
For the time being, the interest in prefabrication of CAD temporary crowns and bridges makes complete sense in terms of reducing the time taken in-session by optimising precision, relining and adjustments. To further the subject of this study, a comparison of the properties of the different temporary resin materials available for the 3-D printer should be performed in an in vitro study. Future studies will be necessary to evaluate better whether this material fulfils the stated objectives for restorations (biological, mechanical and aesthetic).
It would also be interesting to compare the mechanical and optical properties of 3D printing materials and CAD/ CAM materials available for temporary restoration. The utility of either a 3-D DLP printer or a 3-D SLA printer for fabrication of temporary restorations (comparison at the level of printing time and accuracy) may also be considered in another study.
Dr Robbie Hughes is a leading figure in digital dentistry, and his clinical expertise is supported by extensive postgraduate training in implantology, ...
DARMSTADT, Germany: In December 2020, exocad, an Align Technology company, announced the availability of exoplan 3.0 Galway, the latest version of its ...
PALMA DE MALLORCA, Spain: Exocad, an Align Technology company and a leading dental CAD/CAM software provider, successfully concluded Insights 2022, its ...
DARMSTADT, Germany: Exocad, an Align Technology company and a leading dental CAD/CAM software provider, has announced that licensees can book individual ...
COLOGNE, Germany: Exocad, an Align Technology company, is showcasing its latest developments, including new AI-enabled services, the upcoming Chemnitz ...
A major highlight of DentalCAD 3.2 Elefsina is the Preparation Margin Repair tool. This new tool allows dental professionals to digitally restore a ...
For master dental technician Vincent Fehmer, prioritising communication and understanding patient preferences are paramount for achieving successful ...
DARMSTADT, Germany: Exocad, an Align Technology company and a leading dental CAD/CAM software provider, has announced that users of its DentalCAD 3.2 ...
DARMSTADT, Germany: Exocad, an Align Technology company and a leading provider of dental CAD/CAM software, has recently released DentalCAD 3.3 Chemnitz. ...
Education
Live webinar Wed. 22 July 2026 1:00 pm EST (New York)
At exocad Insights 2026, held in Palma de Mallorca in Spain, attendees learned how fully digital workflows go far beyond replacing analogue steps to ...
PALMA DE MALLORCA, Spain: CAD/CAM software provider exocad, an Align Technology company, recently held the fifth edition of exocad Insights under the theme ...

 Brazil / Brasil
 Canada / Canada
 Latin America / Latinoamérica
 USA / USA
 Austria / Österreich
 Bosnia and Herzegovina / Босна и Херцеговина
 Bulgaria / България
 Croatia / Hrvatska
 Czech Republic & Slovakia / Česká republika & Slovensko
 France / France
 Germany / Deutschland
 Greece / ΕΛΛΑΔΑ
 Hungary / Hungary
 Italy / Italia
 Netherlands / Nederland
 Nordic / Nordic
 Poland / Polska
 Portugal / Portugal
 Romania & Moldova / România & Moldova
 Slovenia / Slovenija
 Serbia & Montenegro / Србија и Црна Гора
 Spain / España
 Switzerland / Schweiz
 Turkey / Türkiye
 UK & Ireland / UK & Ireland
 China / 中国
 India / भारत गणराज्य
 Pakistan / Pākistān
 Vietnam / Việt Nam
 ASEAN / ASEAN
 Israel / מְדִינַת יִשְׂרָאֵל
 Algeria, Morocco & Tunisia / الجزائر والمغرب وتونس
 Middle East / Middle East


 Dr. Crystal Marruganti, Cat EdneyRegister now1CELive webinar
 Federico ZunicaRegister now1CELive webinar
 Dr. Sergio FlorencioLive webinar
 Dr. Cameron Shahbazian DMD MBARegister now1CE


 and CDT (Sirona) can be imported in STL format in exocad open software after conversion and exported for fabrication (3D printing or milling) of the provisional restorations.")
 pre-scan.")
.")

 and 3D printed support structure.")

. Zirconia crown set in the mouth (b).")
. Zirconia crown set in the mouth (b).")

. Adjustment of the thickness of the walls of the temporary bridge (b).")
. Adjustment of the thickness of the walls of the temporary bridge (b).")
.")
. Digital impressions (CEREC 3.85) (b).")
. Digital impressions (CEREC 3.85) (b).")
.")
.
Bonded IPS e.max bridge (b).")
.
Bonded IPS e.max bridge (b).")

. 3D PICO2 printer (b).")
. 3D PICO2 printer (b).")

. Temporary printed restoration after glossing (b).")
. Crown set in the mouth (b).")
. Crown set in the mouth (b).")

 and Formlabs’ Form 2 printer (b).")
 and Formlabs’ Form 2 printer (b).")
. Denture tooth resin is used for both prosthetic teeth for removable prostheses and temporary teeth.")
. Denture tooth resin is used for both prosthetic teeth for removable prostheses and temporary teeth.")

 can be done during 3D printing of the temporary crown.")


To post a reply please login or register