At a practice in which digital technologies have been prioritised right from the start, new devices are a real pleasure rather than a duty. That’s why Dr Bernhild-Elke Stamnitz, from Langen in Germany, was delighted to be one of the first dentists to be able to use CEREC Prime scan, the new intraoral scanner from Dentsply Sirona, for her daily work. As a CEREC coach, she is very familiar with digital impressioning, but she is convinced from her first experiences with the device that CEREC Primescan represents a great advance in quality.
“I simply love new technologies,” explains Dr Bernhild-Elke Stamnitz. She has her own fully digital practice, which she has been running in Langen since 2004. During her studies in Heidelberg in Germany, she had her first encounters with CAD/CAM technologies in dentistry. “At the time, it was a long way from being perfect, but in my opinion, the idea behind it was groundbreaking,” she says. “Whereas in the early days of digital impressioning, we still asked ourselves which indications it could really be used for; today we ask ourselves: where can’t it be used?”
For Dr Stamnitz, the advantages are obvious. “First of all, it’s simply faster,” she explains. “One only has to consider the various steps of the process: lay out trays of various sizes and try them for size. Afterwards, all of them have to be prepared for use. Then the material for the impressioning has to be selected, and the first time it might not work perfectly so you have to repeat some steps. All of that can be omitted if you use digital impressioning.” She also sees digital impressioning as providing a path to greater sustainability because nothing has to be thrown away afterwards, and the need to store materials is reduced. Most importantly for Dr Stamnitz, the focus is centred more on the patient. “Digital technologies are also a great communication tool. During digital impressioning, the patient experiences what’s going on, can see the situation in his or her mouth on the screen and is far better able to understand where and why the treatment is necessary.”
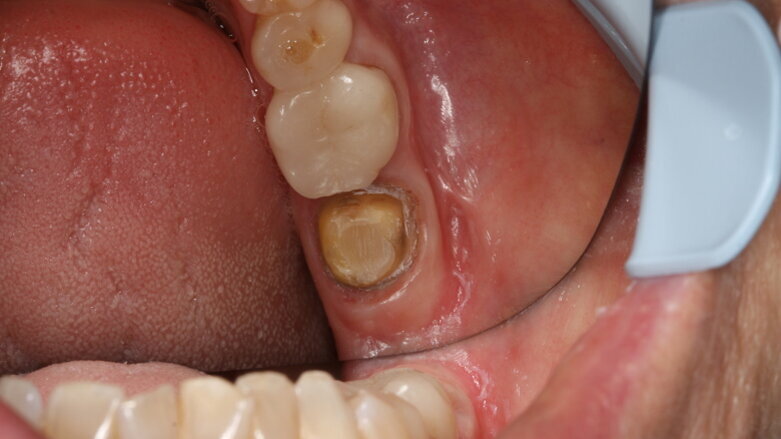
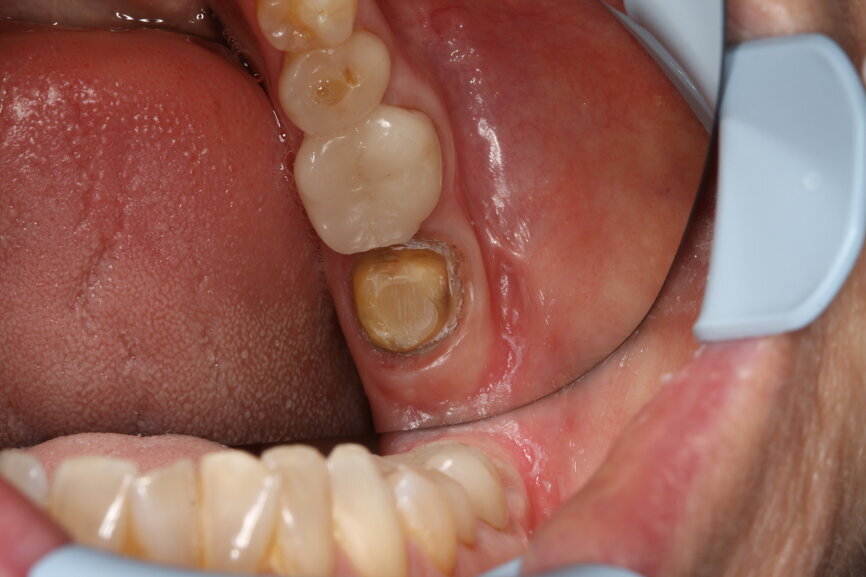
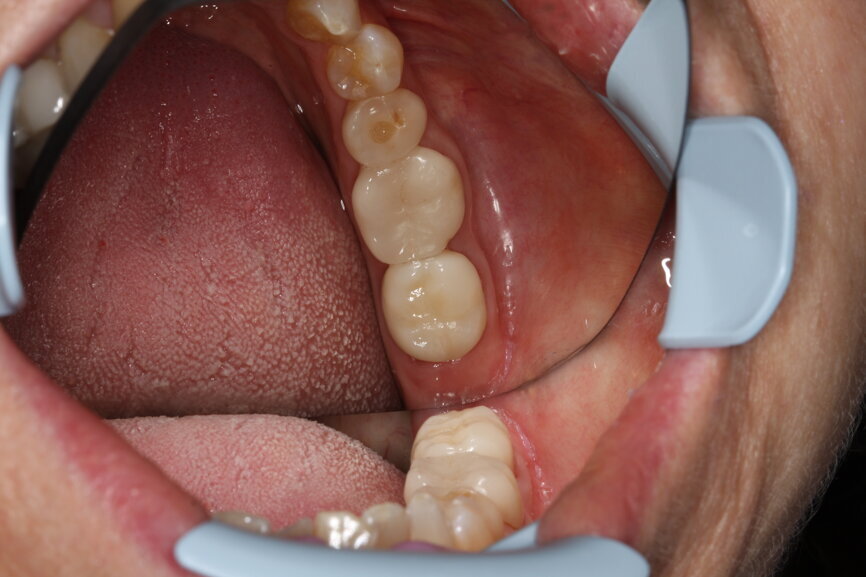
Fig. 1: Initial situation of tooth #37.
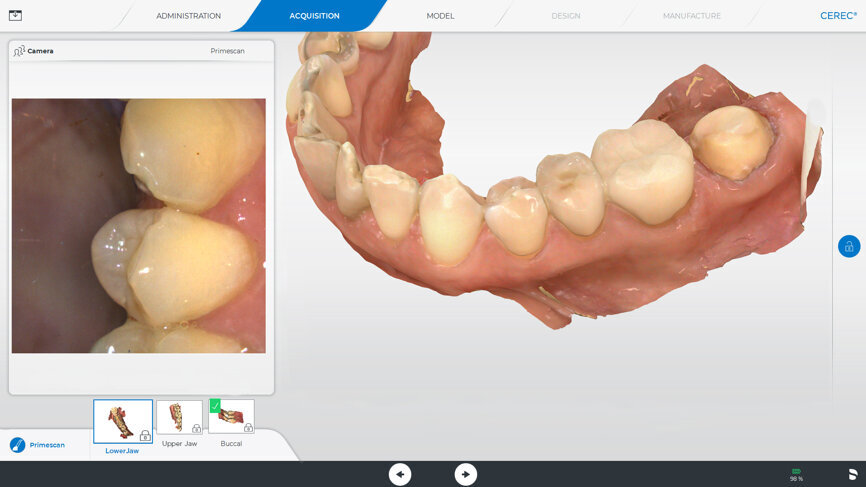
Fig. 2: Scan of lower jaw, with prepared tooth #37.
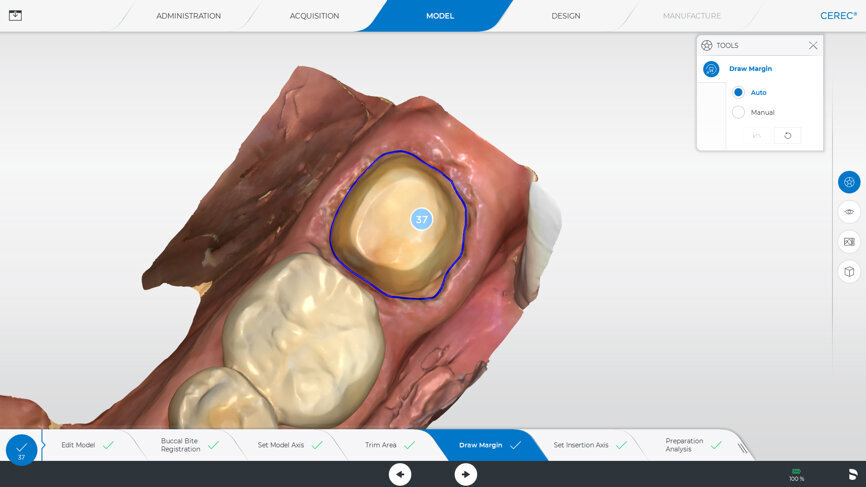
Fig. 3: The preparation margin is automatically delineated by the software, but if desired, it can be adjusted manually.
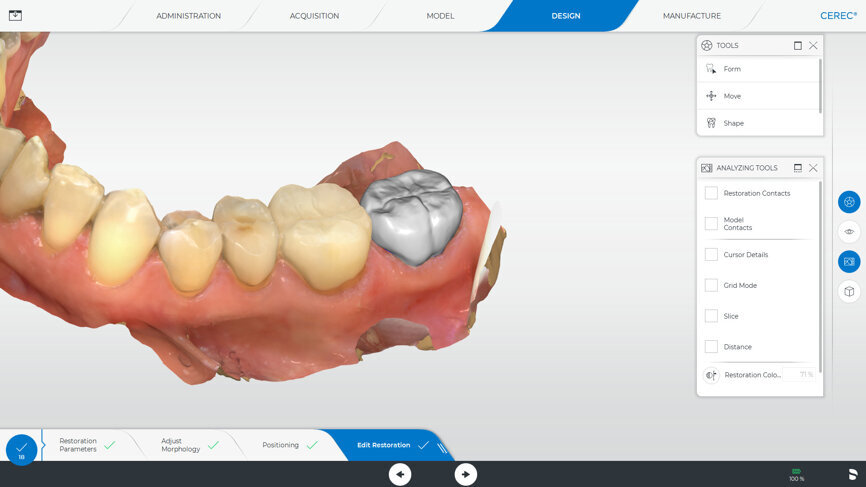
Fig. 4: The user interface for designing the restoration, which can be operated via the touch screen.
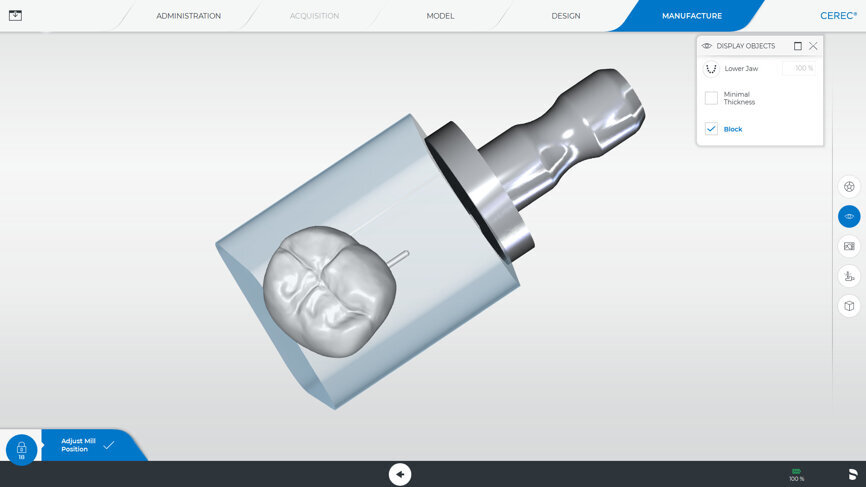
Fig. 5: The user interface for the beginning of the restoration of the crown.
Fig. 6: Final situation of tooth #37.
“Very good” to “simply better”
Once she recognised it as correct and appropriate for her practice, Dr Stamnitz could no longer imagine doing her daily work without digital impressioning. In her opinion, the technology in this area has developed enormously in recent years. On the one hand, this is thanks to the software updates. The calculation of the 3D models, the quality of the initial suggestions and the accuracy of fit have improved constantly. On the other hand, the CEREC Primescan intraoral scanner, which has now entered the marketplace, speeds up and simplifies the process noticeably and produces results that have hardly been possible until now. “Impressioning was already really good before, but now it is simply better.”
In her opinion, this can be demonstrated by several points. With CEREC Primescan, scans can be done in situations where the patient shows signs of periodontally damaged teeth, which are characterised by long crowns and exposed areas of roots. If subgingival preparations need to be made, the scanner can also reach those positions. “Until now, that has been an issue that many people have raised as an argument against digital impressioning,” says the CAD/CAM expert. “Places that are difficult to reach can easily be captured with Primescan without having to make too much effort with the scanner. That really is a great advantage.” Another important improvement is the representation of the margins of the prosthesis. This is very important for the further processing of the scan, because on the one hand, it simplifies the further process of design and fabrication when manufacturing the restoration in the practice, and on the other hand, the scan reliably delivers all the information that the technician requires. He or she can work on the model and can set the occlusion and articulation with ease. Dr Stamnitz mostly works chairside (“I make up to three teeth directly beside the chair”), but she also hands over larger jobs to her dental technician in the in-practice laboratory. “Overall, it is a very useful concept for the practice,” says Dr Stamnitz. “Digital impressioning makes sense, from both a clinical and an economical perspective,” she explains. “But the additional advantage for the patients, who really appreciate the ‘digital experience’, and talk about it to others, is just as important.”
CEREC Primescan—A practical test
A case history demonstrates how CEREC Primescan proves its worth in everyday practice. A patient came to the practice with an inadequate crown, with secondary caries, in position #37. After excavation, a new CEREC crown was to be mounted. In order to do so, the new acquisition centre, CEREC Primescan AC, with its significantly larger, tiltable touch screen, was first disinfected. Thanks to the seamless surfaces, it is possible to do so quickly, thoroughly and simply, at any time. Before beginning with the scans, the patient data was retrieved in CEREC Primescan AC, and a new case was created. Overall, the scanner was used three times during treatment: after preparation of the lower dental arch with tooth #37, for the scan of the opposing dental arch and for the scan of the buccal bite on both sides.
All of that could be delegated to an assistant, but the experienced CEREC user prefers to do it by herself: “I am interested in this technology, and—I’ll be completely honest— scanning is so much fun.”
After removal of the inadequate crown and the final preparation, it was time to use the CEREC Primescan. Dr Stamnitz describes it as follows: “As a long-time user of a CEREC Omnicam, I realised immediately that CEREC Primescan felt different in my hand. The scanner is even better balanced. The actual scanning is quick and easy—partially due to the fact that I don’t have to consider specific scanning angles or scan procedures. It all went intuitively and fluidly. The full dental arch scan was completed in less than a minute, which certainly cannot be taken for granted. What made it really special was that the patient was immediately able to see the results on the monitor with me. The scan was converted into a 3D image immediately. Compared with previous scanners, I noticed immediately that it is also able to scan other materials, such as gold crowns. Therefore, no information on the adjacent teeth or antagonists was lost. I consider that to be real progress.”
After the scan, the software automatically delineates the preparation margin. If so desired, the margin can be adjusted manually. “I find that to be a great advantage,” says the digital expert, “because that way I can decide for myself every time whether I want to accept the suggestion—which, by the way, I generally do with a clear conscience.” It is operated via the touch screen (which replaces the trackball), a tool that many users, including Dr Stamnitz, wished for. Finally, the CEREC Software 5 made an initial suggestion. “I also always look at this very carefully,” she says. “The software can do a lot. I am often surprised at how good the suggestions are. Mostly, as in this case, I am very satisfied after just a few minor adjustments.”
The software learns together with the user
The reason for the significantly improved initial suggestions with the CEREC Software 5 is the use of artificial intelligence. With immediate effect, the new generation of software learns, together with the user, so that it is able to create even better initial suggestions for future versions. Not only are the initial suggestions for the crown improved by artificial intelligence, but the entire workflow is supported by the software in many areas. In this way, the indications for the restoration are automatically recognised, and the preparation margin is delineated. The axis for the model is also set fully automatically.
Dr Stamnitz is fascinated by working directly on the screen: “The workflow is very simple, and thanks to the operation via the touch screen, I can maintain my concentration. I can keep my eyes on the screen constantly.” During the design and preparations for making the crown the patient was there, and she could watch her dentist at work. “In cases like this, the treatment experience is always something very special for my patients,” Dr Stamnitz remarks. “They are included at all times, they are able to ask questions and they can experience, live, how the crown is made.” This one was milled from a Celtra Duo block (Dentsply Sirona), a zirconia-reinforced lithium silicate with excellent aesthetic properties and a high degree of stability. The crown was ready after just 11 minutes. Even during fitting, it was evident that it was a perfect fit. The crown was individualised and glazed with colour and glazing material. Then it was cemented into the patient’s mouth with a high-strength, dual-curing composite cement adhesive (Calibra Ceram, Dentsply Sirona). In this case, the overall time required for the treatment was about 90 minutes. This proved to be particularly advantageous to the patient, who was pressed for time.
Better quality in less time
The accuracy of the scan and the speed of the data acquisition and processing obviously have an effect on the end result—to an experienced user, this becomes apparent immediately. The structure of the crown, especially on the edges, is highly dependent on the quality of the impression, and this is where it pays to use CEREC Prime scan. Dr Stamnitz: “Thanks to the new CEREC Software 5, the ground or milled restorations are worked even more finely and in more detail—and all of this in an even shorter process, from scan to insertion. I spend the time I save on the entire process on my patients. We gain the time to build up a good relationship with them. We are not simply treating a tooth. We are dealing with a patient every time. That’s exactly who should be the centre of focus, because there is more to the lovely smile we help patients to achieve than just attractive, healthy teeth.
Editorial note: This article was published in CAD/CAM - international magazine of digital dentistry No. 02/2019.
AMSTERDAM, Netherlands: Osstell, the developer of ISQ (Implant Stability Quotient) technology, will be introducing the Osstell Beacon at EuroPerio9, to be ...
In traditional practice, occlusal splint fabrication was generally delegated to the dental laboratory. Common fabrication methods are printing and milling. ...
Dr Yo-Han Choi is a dentist and co-owner of Canada Bay Dental in Sydney in Australia. In this interview with Dental Tribune International, he shares his ...
COLOGNE, Germany: Dental professionals are exposed to constant dental noise from several sources. Various studies show evidence of the hearing damage caused...
COLOGNE, Germany: Dental professionals are exposed to constant dental noise from several sources. Various studies show evidence of the hearing damage caused...
Change is in the air. In June, Dental Tribune International reported that Dentsply Sirona and Siemens Healthineers had unveiled plans for a dental dedicated...
Today’s retailers certainly will confirm that when the economy takes a turn for the worse, consumer focus shifts from luxury to necessity. Moreover, ...
The importance of digital marketing is increasing every day. Around 3.6 billion people are connected to the Internet on their phones. In Europe, the density...
ANN ARBOR, Mich., U.S.: Management of a patient’s pain during even the simplest of procedures can be difficult. In a development that may one day simplify...
Russian start-up 3D Smile was founded in response to a lack of software applications for aligner treatment. Marina Domracheva, the founder and CEO, ...
Live webinar
Tue. 10 February 2026
7:00 pm EST (New York)
Prof. Dr. Wael Att, Dr. Robert A. Levine DDS, FCPP, FISPPS, AOD, Dr. Larissa Bemquerer ITI Scholar at Harvard
Live webinar
Wed. 11 February 2026
11:00 am EST (New York)
Dr. med. dent. Sven Mühlemann
Live webinar
Wed. 11 February 2026
12:00 pm EST (New York)
Prof. Dr. Samir Abou Ayash
Live webinar
Fri. 13 February 2026
12:00 pm EST (New York)
Live webinar
Mon. 16 February 2026
12:00 pm EST (New York)
Live webinar
Tue. 17 February 2026
12:00 pm EST (New York)
Live webinar
Wed. 18 February 2026
9:00 am EST (New York)
Dr. Anna Lella, Ms. Francesca Nava


 Austria / Österreich
 Bosnia and Herzegovina / Босна и Херцеговина
 Bulgaria / България
 Croatia / Hrvatska
 Czech Republic & Slovakia / Česká republika & Slovensko
 France / France
 Germany / Deutschland
 Greece / ΕΛΛΑΔΑ
 Hungary / Hungary
 Italy / Italia
 Netherlands / Nederland
 Nordic / Nordic
 Poland / Polska
 Portugal / Portugal
 Romania & Moldova / România & Moldova
 Slovenia / Slovenija
 Serbia & Montenegro / Србија и Црна Гора
 Spain / España
 Switzerland / Schweiz
 Turkey / Türkiye
 UK & Ireland / UK & Ireland
 Brazil / Brasil
 Canada / Canada
 Latin America / Latinoamérica
 USA / USA
 China / 中国
 India / भारत गणराज्य
 Pakistan / Pākistān
 Vietnam / Việt Nam
 ASEAN / ASEAN
 Israel / מְדִינַת יִשְׂרָאֵל
 Algeria, Morocco & Tunisia / الجزائر والمغرب وتونس
 Middle East / Middle East












To post a reply please login or register