The use of porcelain veneers to improve and restore the shape, shade and visual position of anterior teeth is a common technique in aesthetic dentistry. The biomimetic aim in the restoration of teeth relates to not only cosmetic but also functional considerations. It is critical to note that the intact enamel shell of the palatal and facial walls with respect to anterior teeth are responsible for its innate flexural resistance. When the dental structure has been violated by endodontic access, caries or trauma, every effort must be made to preserve the residual structure and to strive to restore or exceed the baseline performance levels of a virgin tooth.
Case background
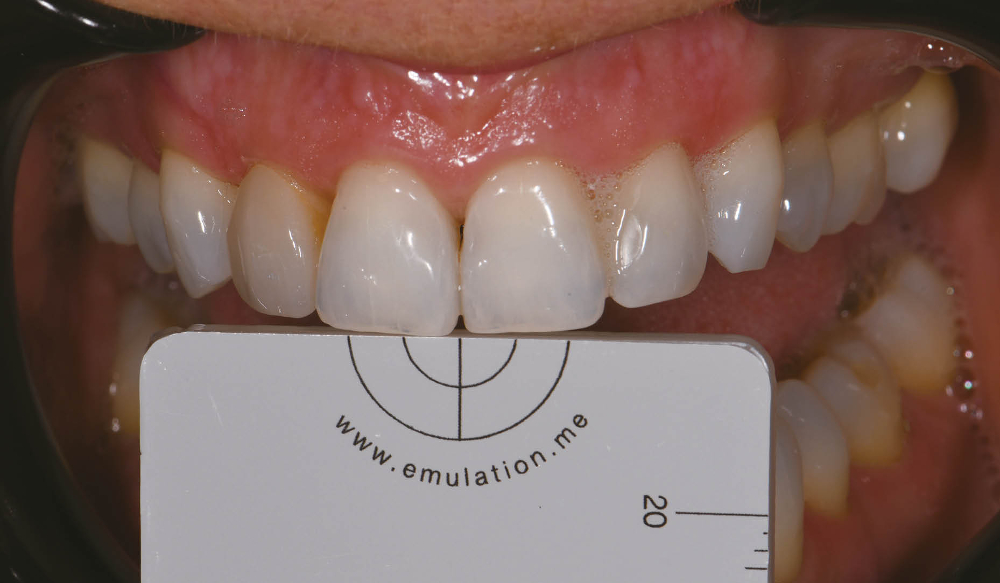
Fig. 1: Reference photograph taken with a 18% neutral grey card.
A 55-year-old female patient with a medical history of controlled hypertension presented to the practice for tooth whitening. It was foreseen that dental bleaching would not have an effect on the shade of a pre-existing porcelain veneer on tooth #12, and that this would need to be retreated after the procedure, especially if the shade value changes were significant. The patient started with a baseline shade of VITA 1M1:2M1 in a 50:50 ratio in the maxillary anterior region and of VITA 1M1 in the mandibular anterior region. After a night guard bleaching protocol with 10% carbamide peroxide worn overnight for three to four weeks, the patient succeeded in achieving a VITA Shade 0M3 in both arches. As a result, there was a significant value discrepancy between the veneered tooth #12 and the adjacent teeth and also increased chroma noted on the contralateral tooth #22 owing to a facially involved Class III composite restoration. Tooth #22 also did not match the contralateral tooth in dimension, and thus the decision was made to treat both lateral incisors with bonded lithium disilicate laminate veneers. The adjacent canine (tooth #23) featured localised mild to moderate cusp tip attrition, but the patient did not want to address this until after the recommended veneers had been placed. The goal of smile design at this stage was to establish bilateral harmony with a view to placing an additional indirect restoration to restore the facial volume and address the cusp tip deficiency of tooth #23 in the near future.
Procedure
A digital smile design protocol was not required for the initial intention, which was individual treatment of the lateral incisors, as slight variation is permitted in this tooth type, being a personality and gender marker of the smile. Prior to anaesthesia, the target shade was selected using retracted photographs featuring both polarised and unpolarised selections. The photographs were prepared for digital shade calibration by taking reference views with an 18% neutral grey–white balance card (Fig. 1).
Figs. 2a & b: Veneer preparation of teeth #12 and 22.
Figs. 2a & b: Veneer preparation of teeth #12 and 22.
The basic body shade was VITA 0M2 with an ingot shade of BL2. The patient was anaesthetised using 1.5 carpules of a 2% lignocaine solution with 1:100,000 adrenaline before affixing a dental dam in a split-dam orientation. The veneer on tooth #12 was sectioned and removed and a minimally invasive veneer preparation completed on tooth #22 (Fig. 2). Partial replacement of the old composite resin restoration was completed on the mesio-inciso-buccopalatal aspect of tooth #12 and the intact segment maintained. Adhesion to old composite was achieved using both microparticle abrasion and a 10-MDP-containing silane coupling agent (CLEARFIL CERAMIC PRIMER PLUS, Kuraray Noritake Dental). The margins were refined, and retraction cord was soaked in an aluminium chloride solution and packed. The preparation stump shades were recorded. The final impressions were taken using both light- and heavy-bodied polyvinylsiloxane in a metal tray. The patient was provisionalised and sent away with instructions to verify the shade at the laboratory at the bisque bake stage. The models prepared by the laboratory verified the minimally invasive nature of the case.
After receipt of the restorations, the patient was anaesthetised and the provisional restorations removed. The preparations were debrided and prepared for bonding by abrading the surfaces using a 27 μm aluminium oxide powder at 30–40 psi. The veneers were assessed using a clear glycerine try-in paste (PANAVIA V5 Try-in Paste clear, Kuraray Noritake Dental). Retraction cord was packed and the intaglio surface of the restorations treated using a 5% hydrofluoric acid for 20 seconds prior to application of CLEARFIL CERAMIC PRIMER PLUS (Fig. 3). The tooth surface was etched using a 33% orthophosphoric acid for 20 seconds and rinsed. A 10-MDP-containing primer (PANAVIA V5 Tooth Primer) was applied to the tooth (Fig. 4) and air-dried according to the manufacturer’s instructions. A veneer cement was loaded (PANAVIA Veneer LC clear; Fig. 5) and the veneer seated. The excess cement was of a non-slumpy character and kept the veneer in place during margin verification prior to a 1-second tack polymerisation (Fig. 6).
Fig. 3: CLEARFIL CERAMIC PRIMER PLUS, which was applied to the intaglio surfaces of the veneers.
Fig. 4: PANAVIA V5 Tooth Primer, which was applied to the etched tooth surfaces.
Fig. 5: PANAVIA Veneer LC in the clear shade loaded on to the prepared intaglio surface of a veneer.
Fig. 6: PANAVIA Veneer LC immediately after seating. Note the viscous, non-slumpy nature of the cement, which allows for ease of removal under both wet and gel-phase options.
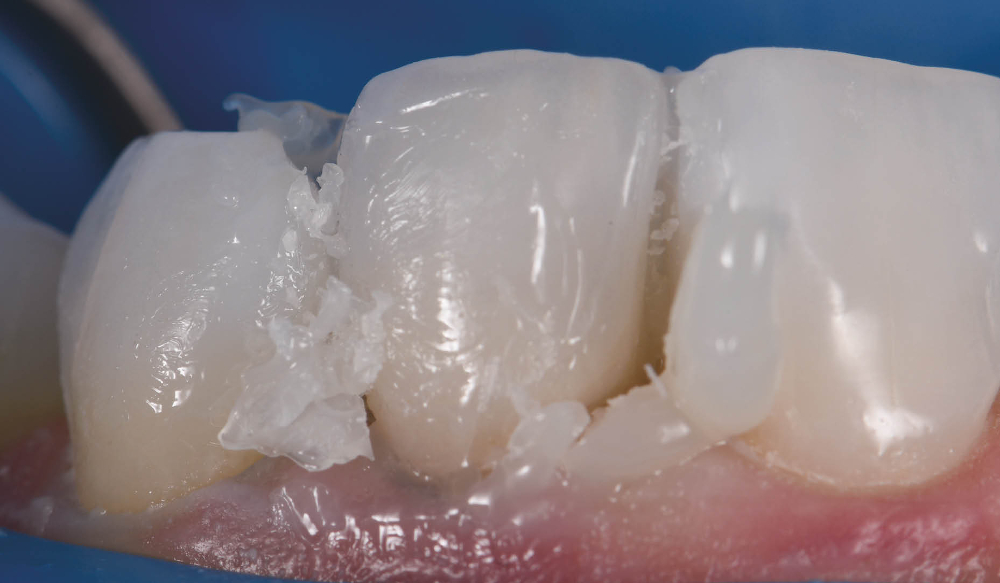
Fig. 7: Excess cement removal after tack polymerisation for 1 second.
The cement was rendered into a gel state, which facilitated clumping or en masse removal of cement, requiring minimal clean-up (Fig. 7). The margins were coated using a clear glycerine gel prior to final polymerisation to eliminate the oxygen inhibition layer (Fig. 8). The margins were finished and polished to a high shine and the occlusion of the restorations verified. The postoperative views showed excellent aesthetic marginal integration (Fig. 9). On polarised photograph reassessment, the restorations were found to be well integrated into the new smile aesthetically and functionally (Fig. 10), and aesthetic augmentation of tooth #23 to match the contralateral canine was awaited.
Rationale for material selection
Porcelain is often the preferred material for veneers owing to its innate stiffness in thin cross section, ability to modify and transmit light for optimal internal refraction and its bondability by way of adhesive protocols to composite resin. This combination of properties allows for maximal preservation of residual tooth structure while bolstering the tooth’s physical function relative to flexural performance.1 The elastic modulus of a tooth can be restored to 96% of its control virgin value if the facial enamel is replaced with a bonded porcelain laminate veneer.2 The elastic modulus of lithium disilicate is 94 GPa, whereas that of intact enamel is 84 GPa. The elastic modulus of dentine has been found to range from 10 to 25 GPa, whereas that of the hybrid layer can vary widely—from 7.5 to 13.5 GPa.3 This low flexural resistance range reflects that of deep dentine and not that of superficial dentine—not an ideal situation if a laminate veneer is bonded to as much enamel as possible or in the worst-case scenario to superficial dentine. Maximal flexural strength of the hybrid layer is invaluable from a biomimetic standpoint. The original 10-MDP monomer present in PANAVIA V5 Tooth Primer elicits a pattern of stable calcium–phosphate nano-layering known as super-dentine, an acid-base resistant zone that is about 600 times more insoluble than that created by the monomer 4-MET, which is found in many other adhesives. Indeed, PANAVIA V5 Tooth Primer is used solely in conjunction with PANAVIA V5 cement and PANAVIA Veneer LC, which both allow the primer to act as a bond without the need to polymerise the layer prior to cementation of the indirect restoration owing to its dual-polymerising potential when bonded together. If a bonding agent is preferred, CLEARFIL Universal Bond Quick, a multimodal adhesive that also contains the essential amide monomer and 10-MDP components created by Kuraray Noritake Dental, can be used. Of note is CLEARFIL Universal Bond Quick’s exceptional flexural strength, owing to the accentuated cross-linking during polymerisation afforded by the amide monomers, to the order of 120 MPa by itself (according to company data).
PANAVIA Veneer LC is a cement system that features cutting-edge technology that provides excellent aesthetics and adhesive stability of indirect restorations while allowing a stress-free workflow. It is a cement system that is a game-changer, one that allows you to restore confidence in the patient and strength in the tooth–restoration interface and bolster your clinical confidence in the delivery of biomimetic excellence.
Fig. 8: Final polymerisation of the veneers from both palatal and facial aspects simultaneously.
Figs. 9a & b: Postoperative aesthetic integration of the veneers on teeth #12 and 22.
Figs. 9a & b: Postoperative aesthetic integration of the veneers on teeth #12 and 22.
Fig. 10: Final result with polarised photography on reassessment.
Editor-in-chief of the International Journal of Esthetic Dentistry and a pioneer of digital dental photography, Dr Alessandro Devigus uses universal ...
TOKYO, Japan: Some companies mainly use basic technologies developed by others to improve their products and introduce new ones, whereas others conduct ...
TOKYO, Japan: People make up to 30,000 decisions every day, and they often must do so very quickly, particularly in busy environments such as that of the ...
TOKYO, Japan: After a FirstLook evaluation that was published in May 2022, a team of evaluators from REALITY Ratings & Reviews thoroughly tested PANAVIA...

 Brazil / Brasil
 Canada / Canada
 Latin America / Latinoamérica
 USA / USA
 Austria / Österreich
 Bosnia and Herzegovina / Босна и Херцеговина
 Bulgaria / България
 Croatia / Hrvatska
 Czech Republic & Slovakia / Česká republika & Slovensko
 France / France
 Germany / Deutschland
 Greece / ΕΛΛΑΔΑ
 Hungary / Hungary
 Italy / Italia
 Netherlands / Nederland
 Nordic / Nordic
 Poland / Polska
 Portugal / Portugal
 Romania & Moldova / România & Moldova
 Slovenia / Slovenija
 Serbia & Montenegro / Србија и Црна Гора
 Spain / España
 Switzerland / Schweiz
 Turkey / Türkiye
 UK & Ireland / UK & Ireland
 China / 中国
 India / भारत गणराज्य
 Pakistan / Pākistān
 Vietnam / Việt Nam
 ASEAN / ASEAN
 Israel / מְדִינַת יִשְׂרָאֵל
 Algeria, Morocco & Tunisia / الجزائر والمغرب وتونس
 Middle East / Middle East

 Dr. Nicolas OuelletWatch recording1CELive webinar

 Dr. Nisha D’Silva BDS, MSD, PhD, Dr. Kıvanç Bektaş-KayhanRegister now1CELive webinar
 Federico ZunicaRegister now1CELive webinar

 Dr. Crystal Marruganti, Cat EdneyRegister now1CE


To post a reply please login or register