The patient reported on in this article is a student in dentistry and his parents are both dentists. They referred their son to a good endodontist, who then referred the case to me. As always, peers are more than welcome in either of my practices, in Rome and London, so when I treated this case, I had three dentists watching me, a future dentist on the chair, placing a great deal of pressure on me.
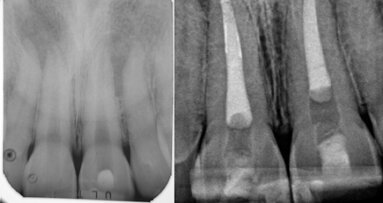
The 22-year-old male patient had a history of trauma to his maxillary incisors and arrived at my practice with symptoms related to tooth #21. The tooth, opened in an emergency by the patient’s mother, was tender when prodded, with a moderate level of sensitivity on the respective buccal gingiva. Sensitivity tests were negative for the other central incisor (tooth #12 was positive), and a periapical radiograph showed radiolucency in the periapical areas of both of the central incisors. The apices of these teeth were quite wide and the length of teeth appeared to exceed 25 mm.
My treatment plan was as follows: root canal therapy with two apical plugs with a calcium silicate-based bioactive cement. The patient provided his consent for the treatment of the affected tooth and asked to have the other treated in a subsequent visit.
After isolating with a rubber dam, I removed the temporary filling, and then the entire pulp chamber roof with a low-speed round drill. The working length was immediately evaluated using an electronic apex locator and a 31 mm K-type file. The working length was determined to be 28 mm.
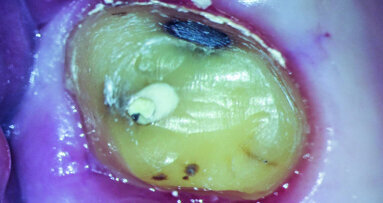
As can be seen in the photographs, the canal was actually quite wide, so I decided to only use an irrigating solution and not a shaping instrument. Root canals are usually shaped so that there will be enough space for proper irrigation and a proper shape for obturation. This usually means giving these canals a tapered shape to ensure good control when obturating. With open apices, a conical shape is not needed, and often there is enough space for placing the irrigating solution deep and close to the apex.
Fig. 1: Pre-operative radiograph
Fig. 2: Intraoperative radiograph of apical plug of tooth #21.
Fig. 3: Post-operative radiograph.
Fig. 5: Intraoperative radiograph of apical plug of tooth #11 (after 6 months from the first treatment).
Fig. 6: Post-operative radiograph.
Fig. 7: Four months follow-up radiograph.
I decided to use only some syringes containing 5 per cent sodium hypochlorite and EDDY, a sonic tip produced by VDW, for delivery of the cleaning solution and to promote turbulence in the endodontic space and shear stress on the canal walls in order to remove the necrotic tissue faster and more effectively. After a rinse with sodium hypochlorite, the sonic tip was moved to and from the working length of the canal for 30 seconds. This procedure was repeated until the sodium hypochlorite seemed to become ineffective, was clear and had no bubbles. I did not use EDTA, as no debris or smear layer was produced.
I suctioned the sodium hypochlorite, checked the working length with a paper point and then obturated the canal with a of 3 mm in thickness plug of bioactive cement. I then took a radiograph before obturating the rest of the canal with warm gutta-percha. I used a compomer as a temporary filling material.
The symptoms resolved, so I conducted the second treatment only after some months, when the tooth #11 became tender. Tooth #21 had healed. I performed the same procedure and obtained the same outcome (the four-month follow-up radiograph showed healing).
Editorial note: A complete list of references are available from the publisher. This article was published in roots - international magazine of endodontology No. 04/2017.
The patient reported on in this article is a student in dentistry and his parents are both dentists. They referred their son to a good endodontist, who then...
Irrigation is a major step in endodontic treatment. A variety of chemicals are used to achieve what I like to consider the chemical preparation of the ...
After access preparation and location of anatomy, the next challenge facing the endodontic clinician is to select the proper file alloy and sequence for the...
VEVEY, Switzerland: Introduced by Swiss endodontic company Produits Dentaires (PD) at the 2019 International Dental Show, EssenSeal is an innovative sealer ...
Much has changed in endodontics during the last 20 years, except the anatomy, which is still just as complex. We can improve our protocols and techniques, ...
The introduction of nickel-titanium (NiTi) rotary instrumentation has made endodontics easier and faster than with hand instrumentation. In addition, ...
Over the last two decades, extensive research has been carried out to alleviate the two major shortcomings of orthodontic treatment: visibility and ...
Minimally invasive—the most well-known oxymoron in dentistry—is probably nowadays considered the new standard of care in almost every field of dental ...
A new generation of root canal sealer engineered and manufactured by the Swiss endodontic company PD (Produits Dentaires SA) enables more effective root ...
What is the secret behind waking up every day, looking forward to peering into the microscope in search of a new adventure or a fresh challenge to solve? ...
Live webinar
Tue. 24 February 2026
1:00 pm EST (New York)
Prof. Dr. Markus B. Hürzeler
Live webinar
Tue. 24 February 2026
3:00 pm EST (New York)
Prof. Dr. Marcel A. Wainwright DDS, PhD
Live webinar
Wed. 25 February 2026
11:00 am EST (New York)
Prof. Dr. Daniel Edelhoff
Live webinar
Wed. 25 February 2026
1:00 pm EST (New York)
Live webinar
Wed. 25 February 2026
8:00 pm EST (New York)
Live webinar
Tue. 3 March 2026
11:00 am EST (New York)
Dr. Omar Lugo Cirujano Maxilofacial
Live webinar
Tue. 3 March 2026
8:00 pm EST (New York)
Dr. Vasiliki Maseli DDS, MS, EdM


 Austria / Österreich
 Bosnia and Herzegovina / Босна и Херцеговина
 Bulgaria / България
 Croatia / Hrvatska
 Czech Republic & Slovakia / Česká republika & Slovensko
 France / France
 Germany / Deutschland
 Greece / ΕΛΛΑΔΑ
 Hungary / Hungary
 Italy / Italia
 Netherlands / Nederland
 Nordic / Nordic
 Poland / Polska
 Portugal / Portugal
 Romania & Moldova / România & Moldova
 Slovenia / Slovenija
 Serbia & Montenegro / Србија и Црна Гора
 Spain / España
 Switzerland / Schweiz
 Turkey / Türkiye
 UK & Ireland / UK & Ireland
 Brazil / Brasil
 Canada / Canada
 Latin America / Latinoamérica
 USA / USA
 China / 中国
 India / भारत गणराज्य
 Pakistan / Pākistān
 Vietnam / Việt Nam
 ASEAN / ASEAN
 Israel / מְדִינַת יִשְׂרָאֵל
 Algeria, Morocco & Tunisia / الجزائر والمغرب وتونس
 Middle East / Middle East








The ultimate reason why root canals fail is bacteria. If our mouths were sterile there would be no decay or infection, and damaged teeth could, in ways, repair themselves. So although we can attribute nearly all root canal failure to the presence of bacteria, I will discuss five common reasons why root canals fail, and why at least four of them are mostly preventable.